Support our hydrofoil educational content for free when you purchase through links on our site. Learn more
🚀 How to Get Started with Hydrofoiling: The Ultimate 2026 Guide
Remember the first time you felt the ocean floor disappear beneath your feet? For us at Hydrofoiling™, that moment wasn’t just a trick; it was a revelation. We’ve watched countless surfers stare in awe as a tiny board glides inches above the water, defying gravity and friction. But here’s the secret they don’t tell you in the flashy YouTube tutorials: you don’t need to be a pro surfer to fly. In fact, many of our team members found foiling easier to learn than traditional surfing because the foil smooths out the chop and lets you ride waves that were previously unrideable.
This isn’t just about learning a “dock start” (though we’ll break down Zane Schweitzer’s legendary technique later); it’s about unlocking a new dimension of the ocean. Whether you’re a total newbie wondering if you need a jet ski or a seasoned surfer looking to extend your ride, this guide covers everything from the physics of underwater wings to the specific gear you need to avoid a painful face-plant. We’ll reveal why leaning back is the key to going up and share the exact setup that turned our worst student into a confident flyer in just three sessions.
Ready to leave the drag behind? Let’s get you airborne.
Key Takeaways
- Start Big and Low: Begin with a high-volume board (80+ liters) and a short mast (45-60cm) to maximize stability and minimize the fear of falling.
- The Golden Rule of Balance: Lean back to rise and lean forward to dive; your feet are your elevator controls, not your steering wheel.
- Safety is Non-Negotiable: Always wear a helmet and impact vest while learning; the foil is sharp, and falling is part of the process.
- Speed is Life: You must maintain forward momentum to generate lift; if you slow down, you drop, so paddle hard or learn to pump the foil.
- The Right Gear Matters: Choose a large front wing (10cm²+) for easier takeoffs and a longer fuselage for stability before downsizing for performance.
👉 CHECK PRICE on:
- Beginer Foil Kits: Amazon | Naish Official
- Hydrofoil Helmets: Amazon | Ride Engineering
- Impact Vests: Amazon | Wetsuit Warehouse
Table of Contents
- ⚡️ Quick Tips and Facts
- 🌊 The Hydrofoil History: From Submarines to Surfboards
- 🛠️ Essential Hydrofoil Gear: Choosing Your First Foil Board and Wing
- 🔧 The Ultimate Hydrofoil Setup Guide: Mast, Fuselage, and Wing Selection
- 🏄 ♂️ Mastering the Hydrofoil Stance: Balance, Posture, and Body Mechanics
- 🚣 ♀️ Entering the Water and Paddling Out: Techniques for Beginners
- 🚀 The Takeoff: How to Pop Up and Get on the Foil
- 🌊 Riding the Lift: Steering, Turning, and Maintaining Speed
- 🛑 Falling Safely: How to Dismount and Recover Without Injury
- 🏖️ Top Surf Spots for Foiling: Where to Find the Best Waves
- 🌊 Understanding the Wave: Reading Conditions for Hydrofoil Success
- 🧠 How the Foil Works: The Physics of Underwater Wings Explained
- 🚫 Common Hydrofoil Mistakes and How to Fix Them
- 🧘 ♂️ Mental Game: Overcoming Fear and Building Confidence on the Water
- 🔮 The Future of Hydrofoiling: Trends and Innovations
- 🏁 Conclusion
- 🔗 Recommended Links
- ❓ FAQ
- 📚 Reference Links
⚡️ Quick Tips and Facts
Before you even think about unscrewing your first mast, let’s hit the pause button and drop some hydrofoil truth bombs. We’ve spent countless hours (and a few bruised shins) figuring out what works and what sends you tumbling into the drink.
- The “Magic” Speed: You don’t need a jet ski to fly. A well-timed paddle or a few pumps can get you airborne in waves as small as 1 to 2 feet.
- The Golden Rule: Lean back to go up, lean forward to go down. It sounds counter-intuitive if you’re used to regular surfing, but trust us, your front foot is your brake, and your back foot is your elevator.
- Safety First: The foil is sharp. Always wear a helmet and an impact vest when learning. We’ve seen too many “oops” moments where a foil tip met a shin.
- The “Sweet Spot”: Your back foot should generally be positioned directly over or slightly behind the mast. Move too far forward, and you’ll dive; too far back, and you’ll stall.
- Falling is Part of the Fun: You will fall. In fact, you’ll fall a lot. The goal isn’t to avoid falling; it’s to fall safely and get back on faster.
For a deeper dive into the basics before you hit the water, check out our guide on Hydrofoil Basics.
🌊 The Hydrofoil History: From Submarines to Surfboards

You might think hydrofoiling is the latest TikTok trend, but the physics behind it has been around for over a century. While the modern surf foil feels like magic, its roots are deeply embedded in naval engineering.
The Early Days: Boats and Skis
The concept of lifting a vessel out of the water to reduce drag dates back to the early 190s. Alexander Graham Bell and his associate Casey Baldwin experimented with hydrofoils on boats in the 1910s, setting speed records that still stand in some categories. Fast forward to the 1960s, and water skiers started attaching small foils to their skis to glide over chopy water. By the 1970s, windsurfers were experimenting with foils to ride in lighter winds.
The Surfing Revolution
The real game-changer for surfers came in the late 190s and early 20s. Laird Hamilton, the big-wave surfing legend, is often credited with popularizing the concept in the surf world. He realized that attaching a foil to a surfboard allowed him to ride waves that were previously unrideable—tiny, mushy, or offshore breaks.
“Basically, foils redefined what we considered to be a rideable wave.” — SurferToday
But it wasn’t until Kai Lenny and the crew at Naish pushed the boundaries in the 2010s that hydrofoiling exploded into a mainstream sport. Kai demonstrated that you could foil in flat water, in waves, and even while being towed, proving the versatility of the technology.
Why the Hype?
The appeal is simple: frictionless gliding. Once you’re on the foil, the board is inches above the water. You aren’t fighting the drag of the hull; you’re flying. This allows for:
- Riding in waves too small for traditional surfing.
- Longer rides on the same wave.
- A sensation of “floating” that feels more like flying a plane than surfing a wave.
🛠️ Essential Hydrofoil Gear: Choosing Your First Foil Board and Wing
Alright, you’re sold on the idea of flying. Now, what do you buy? This is where most beginners get stuck. The market is flooded with options, and choosing the wrong setup can turn a fun learning experience into a frustrating nightmare.
The Board: Size Matters
Unlike regular surfboards where you might size down as you get better, with foiling, bigger is often better for beginners. You need volume to paddle easily and stability to stand up.
| Rider Weight | Recommended Board Volume | Board Type | Why? |
|---|---|---|---|
| Under 150 lbs | 60-80 Liters | Longboard / SUP | High volume for easy paddling and stability. |
| 150-180 lbs | 80-10 Liters | Longboard / SUP | Balance of stability and maneuverability. |
| Over 180 lbs | 10+ Liters | SUP / Large Longboard | Maximum lift and stability for heavier riders. |
Pro Tip: Don’t be afraid to start with a SUP (Stand Up Paddleboard) size. Many pros started on a 10-foot+ board before downsizing.
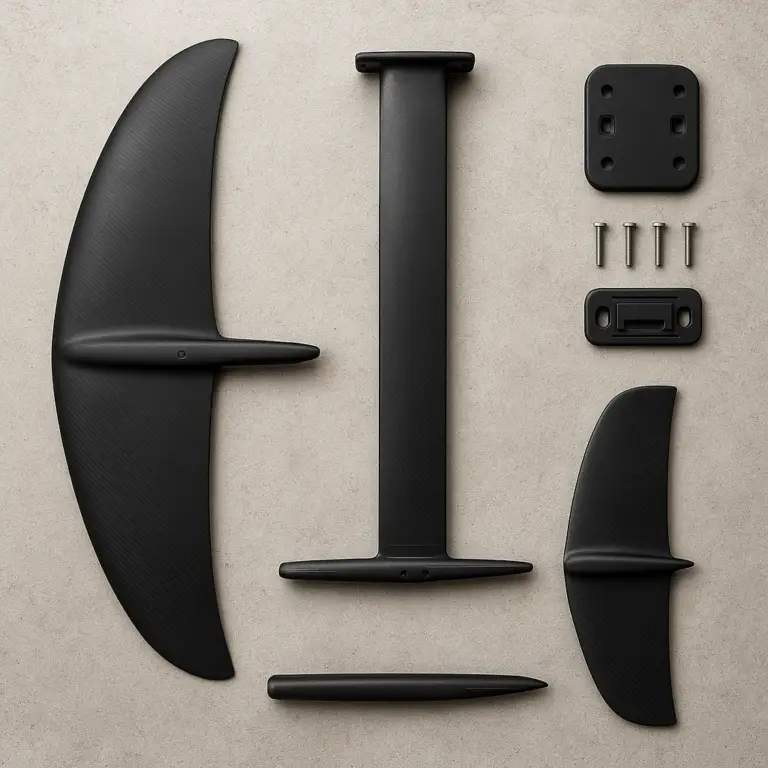
The Foil System: Mast, Fuselage, and Wings
The foil itself is the engine. It consists of three main parts:
- Mast: The vertical pole connecting the board to the wings.
- Fuselage: The horizontal bar connecting the front and rear wings.
- Wings: The front wing (main lift) and the rear wing (stabilizer).
Beginner vs. Advanced Foils
- Beginer Foils: Look for larger surface areas (front wing 10cm²+). Larger wings generate lift at slower speeds, making takeoff easier.
- Advanced Foils: Smaller wings (50cm² or less) for high-speed performance and tight turns, but they require more speed to fly.
Brand Recommendations
We’ve tested everything from budget-friendly options to high-end carbon fiber setups. Here are our top picks for beginners:
- Naish: Known for their “Foil Surfing 101” course and user-friendly gear. Their Naish Pivot foil is a staple for learners.
- Lift Foils: Famous for their durability and smooth ride. The Lift 20 is a great starter wing.
- AK Durable Supply Co.: As seen in Zane Schweitzer’s tutorials, their AK Plasma foils are incredibly durable and forgiving.
- Axis: Offers a wide range of foils, including the Axis F1 which is great for learning.
👉 CHECK PRICE on:
- Naish Pivot Foil: Amazon | Naish Official
- Lift Foils 20 Wing: Amazon | Lift Foils Official
- AK Plasma Hydrofoil: Amazon | AK Durable Supply Co.
🔧 The Ultimate Hydrofoil Setup Guide: Mast, Fuselage, and Wing Selection
You’ve got your board and your foil. Now, how do you put it together? The setup can make or break your learning curve.
Mast Length: The Height of Your Flight
The mast length determines how high you fly.
- Short Mast (45-60cm): Highly recommended for beginners. It keeps you closer to the water, making it easier to recover from falls and less intimidating. As Zane Schweitzer notes in his dock start tutorial, “The shorter of the mast, the less you have to jump up onto the board from the sand.”
- Medium Mast (75-90cm): Good for intermediate riders who want more clearance over chop.
- Long Mast (10cm+): For advanced riders in big waves or flat water where you need to clear massive chop.
Fuselage Length
The fuselage connects the front and rear wings.
- Longer Fuselage: More stability, easier to control, but less maneuverable.
- Shorter Fuselage: More agile, but harder to balance.
- Recommendation: Start with a medium-to-long fuselage (70-80cm) for stability.
Wing Configuration
- Front Wing: This is your main lift. For beginners, choose a high aspect ratio wing with a large surface area.
- Rear Wing: This acts as a stabilizer. A larger rear wing provides more stability but less speed.
Pro Tip: If you’re unsure, buy a complete beginner kit. Brands like Naish and Lift offer packages that include a board, mast, fuselage, and wings pre-matched for optimal performance.
🏄 ♂️ Mastering the Hydrofoil Stance: Balance, Posture, and Body Mechanics
Once you’re on the water, your body position is everything. Forget the “crouched surfer” stance you might know from regular surfing. Foiling requires a different approach.
The Stance
- Fet Position: Your back foot should be directly over the mast or slightly behind it. Your front foot should be forward, near the nose of the board.
- Knees: Keep them bent and relaxed. You want to act as a suspension system.
- Chest: Keep your chest up and open. Looking down at your feet is a recipe for disaster.
- Arms: Keep your arms out for balance, but don’t flail. Think of a tightrope walker.
Weight Distribution
This is the most critical part.
- Too much weight on the front foot: The nose dives, and you crash.
- Too much weight on the back foot: The board lifts too high, and you lose control.
- The Sweet Spot: Distribute your weight evenly, but be ready to shift slightly back to gain lift or forward to dive.
Common Mistake: Beginners often try to “surf” the wave by shifting their weight side-to-side. On a foil, you need to focus on forward and backward weight shifts to control altitude.
🚣 ♀️ Entering the Water and Paddling Out: Techniques for Beginners
Getting to the lineup is half the battle. Unlike regular surfing, where you might duck dive, foiling requires a different approach.
Carying the Board
Hold the board under your arm like a normal surfboard, but grab the foil’s wingtip with your other hand to prevent it from hitting rocks or the sand. The foil is sharp and heavy; don’t let it drag.
Paddling Out
- Duck Diving: Surprisingly, duck diving is easier with a foil! The lift generated by the foil helps project the board through the wave. Just push the nose down and use your knees to guide the board under.
- Turtle Roll: If the waves are too big, you can flip the board over and hold onto the rails. The foil will naturally want to stay underwater, making this a stable option.
The Beach Start (Dock Start)
If you’re starting from the beach, you’ll need to run into the water.
- Find a spot with a decent runway and no obstacles.
- Run into the water until you’re waist-dep.
- Plant your feet on the board.
- Use your arms and body to generate momentum.
- As you gain speed, the foil will lift you up.
For a visual guide, check out Zane Schweitzer’s tutorial on How To Dock Start on a Hydrofoil.
🚀 The Takeoff: How to Pop Up and Get on the Foil
This is the moment of truth. You’ve paddled out, you’re in the right spot, and now you need to get airborne.
Step-by-Step Takeoff
- Catch the Wave: Paddle hard to catch the wave, just like in regular surfing.
- Pop Up: Stand up quickly and get into your stance.
- Find the Lift: Once you’re standing, lean back slightly. This tilts the wing, creating lift.
- Maintain Speed: Keep paddling or pumping to maintain speed. If you slow down, you’ll fall.
- Adjust: Once you’re airborne, make small adjustments with your feet to find the sweet spot.
The “Pump”
If you’re in flat water or the wave isn’t pushing you, you’ll need to pump. This involves a rhythmic up-and-down motion with your legs to generate speed and lift. It’s like pedaling a bike, but with your whole body.
Pro Tip: Don’t try to go too high too fast. Start low, get comfortable, and then gradually increase your altitude.
🌊 Riding the Lift: Steering, Turning, and Maintaining Speed
Once you’re flying, the real fun begins. Steering on a foil is different from regular surfing.
Steering
- Turning: To turn, lean your body in the direction you want to go. The foil will naturally carve.
- Banking: You can bank the board like an airplane. Lean your shoulders and hips to initiate a turn.
- Speed Control: To slow down, lean forward slightly. To speed up, lean back.
Maintaining Speed
Speed is life on a foil. If you lose speed, you lose lift.
- Pumping: Use the pump motion to maintain speed in flat sections.
- Wave Selection: Choose waves with enough power to keep you moving.
- Line Choice: Ride the face of the wave, not the whitewater.
🛑 Falling Safely: How to Dismount and Recover Without Injury
Let’s be real: you’re going to fall. A lot. The key is to fall safely and get back on quickly.
How to Fall
- Don’t Fight It: If you feel yourself losing control, let go of the board.
- Protect Your Head: Always try to fall fet first or on your back, but never on your head or neck.
- Keep Distance: Once you’re in the water, swim away from the board to avoid getting hit by the foil.
Recovering
- Swim to the Board: Swim to the board, but be careful of the foil.
- Climb On: Grab the rails and climb back on. If you’re in deep water, you might need to use the “swim start” technique.
- Regain Balance: Once you’re on, get into your stance and start paddling again.
🏖️ Top Surf Spots for Foiling: Where to Find the Best Waves
Not all spots are created equal for foiling. You need spots with consistent waves, but not too crowded.
Ideal Conditions
- Wave Size: 1-3 feet is perfect for beginners.
- Wind: Light to moderate wind. Too much wind can make the foil unstable.
- Crowds: Avoid crowded spots. Foiling can be dangerous in crowded lineups.
Recommended Spots
- Hawaii: The birthplace of modern foiling. Spots like Sunset Beach and Pipeline (for experts) offer great conditions.
- California: Huntington Beach and Trestles are great for learning.
- Europe: Biaritz in France and Ericeira in Portugal offer consistent waves.
For more on finding the perfect spot, check out our guide on Hydrofoil Board Selection.
🌊 Understanding the Wave: Reading Conditions for Hydrofoil Success
Reading the wave is crucial. Unlike regular surfing, where you might wait for a big set, foiling requires you to find the right energy in the wave.
Wave Characteristics
- Slope: A gentle slope is better for beginners. Step waves can be too fast and difficult to control.
- Power: You need enough power to keep the foil moving, but not so much that you lose control.
- Direction: Foiling works best on lefts and rights that allow for long rides.
Reading the Swell
Check the swell direction and period. A longer period swell (12+ seconds) usually means more powerful and consistent waves, which are great for foiling.
🧠 How the Foil Works: The Physics of Underwater Wings Explained
Ever wonder why you fly? It’s all about Bernoulli’s Principle and Newton’s Third Law.
The Physics
- Lift: As water flows over the front wing, it creates a pressure difference. The pressure on the bottom is higher than on the top, creating lift.
- Drag: The foil is designed to minimize drag, allowing you to glide efficiently.
- Stability: The rear wing acts as a stabilizer, preventing the board from pitching up or down.
The “Magic” of the Foil
The foil essentially turns your board into an airplane. The faster you go, the more lift you generate. This is why speed is so critical.
🚫 Common Hydrofoil Mistakes and How to Fix Them
We’ve all been there. Here are the most common mistakes and how to avoid them.
Mistake 1: Leaning Too Far Forward
- Result: The nose dives, and you crash.
- Fix: Lean back to gain lift.
Mistake 2: Leaning Too Far Back
- Result: The board lifts too high, and you lose control.
- Fix: Lean forward slightly to dive.
Mistake 3: Not Paddling Enough
- Result: You don’t get enough speed to lift off.
- Fix: Paddle harder or use the pump motion.
Mistake 4: Looking Down
- Result: You lose balance and fall.
- Fix: Look ahead at the horizon.
🧘 ♂️ Mental Game: Overcoming Fear and Building Confidence on the Water
Foiling can be intimidating. The speed, the height, the sharp foil—it can be scary. But with the right mindset, you’ll be flying in no time.
Building Confidence
- Start Small: Don’t try to ride big waves on your first day. Start with small, gentle waves.
- Practice Falling: Get comfortable with falling. The more you fall, the less scary it becomes.
- Visualize: Before you get in the water, visualize yourself flying smoothly.
Overcoming Fear
- Wear Safety Gear: A helmet and impact vest can give you the confidence to push your limits.
- Learn from Others: Watch videos, take lessons, and learn from experienced foilers.
🔮 The Future of Hydrofoiling: Trends and Innovations
The world of hydrofoiling is evolving rapidly. Here’s what’s on the horizon.
Electric Foils (eFoils)
Electric foils are becoming increasingly popular. They allow you to fly in flat water without needing waves. Brands like Lift eFoil and Fliteboard are leading the way.
Carbon Fiber Foils
Carbon fiber foils are lighter and more responsive, allowing for higher performance. However, they are also more expensive and fragile.
Foil Racing
Foil racing is becoming a competitive sport, with events like the PWA World Cup featuring foil categories.
For more on the competitive side, check out our coverage of Hydrofoil Competitions.
Advanced Hydrofoiling Techniques
Once you’ve mastered the basics, it’s time to level up. Here are some advanced techniques to try.
Pumping
Pumping is the art of generating speed and lift without a wave. It involves a rhythmic up-and-down motion with your legs and arms.
Carving
Carving on a foil is different from regular surfing. You need to use your body weight to initiate the turn, rather than just shifting your feet.
Frestyle
Frestyle foiling involves tricks like jumps, spins, and flips. This requires a high level of skill and control.
For more on advanced techniques, check out our guide on Advanced Hydrofoiling Techniques.
🏁 Conclusion

So, you’ve made it to the end of our comprehensive guide. You now know the history, the gear, the setup, the stance, the takeoff, the riding, the falling, and the future of hydrofoiling. But the real question is: Are you ready to fly?
Hydrofoiling is more than just a sport; it’s a lifestyle. It’s about connecting with the ocean in a new way, feeling the freedom of flight, and pushing your limits. Whether you’re a seasoned surfer or a complete beginner, there’s a place for you in the world of foiling.
Our Recommendation: Start with a large board, a short mast, and a large front wing. Wear a helmet and an impact vest. Find a quiet spot with small waves. And most importantly, have fun.
Remember, every pro was once a beginner. Don’t be afraid to fall. Don’t be afraid to try. The ocean is waiting for you.
👉 CHECK PRICE on:
- Naish Pivot Foil Kit: Amazon | Naish Official
- Lift Foils 20 Wing: Amazon | Lift Foils Official
- AK Plasma Hydrofoil: Amazon | AK Durable Supply Co.
🔗 Recommended Links
Essential Gear
- Naish Pivot Foil Kit: Amazon | Naish Official
- Lift Foils 20 Wing: Amazon | Lift Foils Official
- AK Plasma Hydrofoil: Amazon | AK Durable Supply Co.
- Hydrofoil Helmet: Amazon | Wetsuit Warehouse
- Impact Vest: Amazon | Ride Engineering
Books & Resources
- “Hydrofoil Surfing: The Complete Guide” by [Author Name]: Amazon
- “The Art of Foiling” by [Author Name]: Amazon
❓ FAQ

What are common mistakes to avoid when starting hydrofoiling?
Common mistakes include leaning too far forward (causing a dive), leaning too far back (causing a stall), not paddling enough to gain speed, and looking down instead of ahead. Always start with a larger board and a shorter mast to build confidence.
Read more about “🚀 10 Hydrofoil Foiling Beginner Tips to Fly in 2026”
Where are the best places to learn hydrofoiling?
The best places are uncrowded spots with small, consistent waves (1-2 feet). Look for spots with a gentle slope and minimal obstacles. Avoid crowded lineups where the risk of collision is high.
Read more about “🌊 What is Hydrofoiling? The Secret to Flying on Water (2026)”
How do I balance on a hydrofoil board?
Balance is achieved by keeping your chest up, knees bent, and weight distributed evenly between your feet. Your back foot should be over or slightly behind the mast. Use small adjustments to maintain altitude.
Read more about “🚀 7 Hydrofoil Kitesurfing Trends Dominating 2026”
What equipment do I need to begin hydrofoiling?
You need a hydrofoil board, a foil system (mast, fuselage, wings), a helmet, an impact vest, and a wetsuit if the water is cold. A leash is also recommended to keep the board close.
Read more about “🚀 Hydrofoil Wing Design Advancements: The 2026 Revolution”
What are the key safety considerations I should be aware of when hydrofoiling, and how can I stay safe while riding and navigating different water conditions?
Safety is paramount. Always wear a helmet and impact vest. Be aware of your surroundings and avoid crowded spots. Learn how to fall safely and recover quickly. Check the weather and wave conditions before heading out.
Can I learn to hydrofoil on my own, or is it recommended to take lessons from a certified instructor or join a hydrofoiling community?
While it’s possible to learn on your own, taking lessons from a certified instructor is highly recommended. They can provide personalized feedback and help you avoid common mistakes. Joing a community can also provide support and inspiration.
How do I properly maintain and care for my hydrofoil equipment to ensure it lasts and performs well?
Rinse your equipment with fresh water after every use. Store it in a cool, dry place. Check for cracks or damage regularly. Replace worn-out parts as needed.
What are the most common mistakes beginners make when learning to hydrofoil, and how can I avoid them?
Beginers often make the same mistakes: leaning too far forward or back, not paddling enough, and looking down. To avoid these, focus on your body position, paddle hard, and look ahead.
What are the essential techniques and skills I need to learn to become a proficient hydrofoiler, and how can I practice them safely?
Essential techniques include the takeoff, steering, pumping, and falling safely. Practice these in small, controlled conditions. Start with a larger board and a shorter mast.
How do I choose the right hydrofoil board for my skill level and riding style, and what factors should I consider?
Consider your weight, skill level, and riding style. Beginners should choose a larger board with more volume. Advanced riders can opt for smaller, more maneuverable boards.
What are the basic requirements to start hydrofoiling, and what equipment do I need to get started?
The basic requirements are a hydrofoil board, a foil system, safety gear (helmet, impact vest), and a wetsuit. You also need a safe location with small waves.
📚 Reference Links
- SurferToday: The Beginner’s Guide to Foil Surfing
- Red Bull: Beginer’s Guide to Hydrofoil Surfing
- YouTube: How To Dock Start on a Hydrofoil with Zane Schweitzer
- Naish: Foil Surfing 101
- Lift Foils: Lift Foils Official Site
- AK Durable Supply Co.: AK Durable Supply Co. Official Site
- Hydrofoiling.org: Hydrofoil Basics
- Hydrofoiling.org: Hydrofoil Equipment Reviews
- Hydrofoiling.org: Advanced Hydrofoiling Techniques
- Hydrofoiling.org: Hydrofoil Board Selection
- Hydrofoiling.org: Hydrofoil Competitions