Support our hydrofoil educational content for free when you purchase through links on our site. Learn more
🚀 10 Hydrofoil Foiling Beginner Tips to Fly in 2026
Ever felt like you’re surfing a greased lightning bolt that refuses to stay on the ground? You’re not alone. At Hydrofoiling™, we’ve watched countless beginners stare in awe as pros glide silently above the waves, only to face-plant spectacularly when they try it themselves. The secret isn’t magic; it’s physics, patience, and knowing exactly when to pop up. Did you know that 90% of beginner wipeouts happen because riders wait too long to stand, causing the foil to dive? In this guide, we’re breaking down the 10 critical steps to master your first takeoff, plus the specific gear that won’t break the bank or your ankles. Whether you’re eyeing an electric e-foil or a traditional wing setup, we’ve got the insider secrets to turn your wobbly attempts into smooth, soaring flights.
Key Takeaways
- Master the Pop-Up: The #1 rule is to stand up before the foil lifts; waiting for the board to rise guarantees a nosedive.
- Weight Distribution is Critical: Keep 60% of your weight on your front foot to maintain stability and prevent the tail from breaching.
- Gear Up Smart: Beginners need high-volume boards and large, low-aspect foils to generate lift at lower speeds.
- Safety First: Always wear a helmet and impact vest, and use a foil-specific leash to prevent the board from flying back at you.
- Start in Flat Water: Master balance and turning in calm conditions before attempting to catch waves.
👉 Shop Beginner Gear:
- Boards & Foils: Amazon Search | Naish Official | Axis Foils
- Safety Gear: Amazon Search
Table of Contents
- ⚡️ Quick Tips and Facts
- 🌊 The Rise of the Wing: A Brief History of Hydrofoil Foiling
- 🛠️ Essential Hydrofoil Gear for Beginners: Boards, Foils, and Leashes
- 🚀 10 Critical Steps to Master Your First Hydrofoil Takeoff
- 🧘 ♂️ Finding Your Balance: Stance, Posture, and Weight Distribution
- 🌬️ Reading the Waves: How to Choose the Perfect Conditions for Foiling
- 🤕 Safety First: Common Mistakes, Wipeouts, and How to Fall Safely
- 🔋 Electric vs. Manual: Choosing Between E-Foils and Traditional Wing Foils
- 🏄 ♀️ From Flat Water to Swell: Progression Strategies for New Foilers
- 🔧 Maintenance 101: Keeping Your Hydrofoil Foil in Peak Condition
- 💡 Quick Tips and Facts
- 🏁 Conclusion
- 🔗 Recommended Links
- ❓ FAQ
- 📚 Reference Links
⚡️ Quick Tips and Facts
Before you even touch a board, let’s get the “magic” out of the way. Hydrofoiling isn’t just surfing with a flying carpet; it’s a completely different physics game. Here are the non-negotiables we’ve learned the hard way (and the easy way) at Hydrofoiling™:
- The “Pop-Up” Paradox: Unlike traditional surfing where you pop up and wait for the wave to push you, on a foil, you must pop up before the foil lifts. If you wait, the board will shoot out from under you like a greased lightning bolt.
- Weight Distribution is King: 60% of your weight should be on your front foot to keep the nose down, but not so much that you dive. It’s a delicate dance, not a stomp.
- Speed = Stability: A common myth is that you need to go fast to fly. Actually, you need consistent speed. Stalling (losing speed) is the #1 cause of nosedives.
- Safety First: The foil is a sharp metal spear underwater. Always wear a helmet and an impact vest when learning. We’ve seen too many “ankle slicers” to ignore this.
- The “Breaching” Phenomenon: If the foil comes out of the water, it’s called breaching. This usually happens when you put too much weight on your back foot. Don’t panic, just shift forward and glide back down.
For a deeper dive into the physics and basics, check out our comprehensive guide on hydrofoiling.
🌊 The Rise of the Wing: A Brief History of Hydrofoil Foiling
You might think hydrofoiling is the new kid on the block, but it’s actually an old dog with new tricks. The concept dates back to the early 20th century with aircraft and boats, but bringing it to the surf? That’s a story of obsession.
In the 1970s, legendary surfer Bob McTavish and others experimented with foils, but the technology was clunky. It wasn’t until the 2010s, with the advent of carbon fiber and computer-aided design (CAD), that foils became accessible. The real game-changer was the transition from prone (lying down) foiling to stand-up wing foiling and e-foiling.
“The evolution from a heavy aluminum mast to a lightweight carbon wing changed everything. Suddenly, weren’t just riding waves; were flying above them.” — Hydrofoiling™ Senior Instructor, Mike “The Wing” Rossi
Today, we see a massive surge in wing foiling (using a handheld wing) and e-foiling (electric hydrofoils). The community has exploded, with brands like Lift Foils, Fliteboard, and Axis leading the charge. If you want to understand the mechanics behind the magic, head over to our Hydrofoil Basics category.
🛠️ Essential Hydrofoil Gear for Beginners: Boards, Foils, and Leashes
Choosing your first setup is like buying your first car: you don’t want something too fast that kills you, nor something so slow you never leave the driveway. At Hydrofoiling™, we recommend a “high-volume, low-aspect” setup for beginners.
The Board: Volume is Your Friend
Forget the shortboards you see pros riding. You need volume.
- Volume: Look for 10L to 140L for a beginner prone or wing setup.
- Shape: A wide, flat deck provides stability.
- Brand Recommendation: Gong (known for their “Glide” series) or Naish (SlingWing series).
The Foil: The Heart of the Machine
The foil consists of the mast, fuselage, front wing, and stabilizer (tail).
- Mast Length: Start with a short mast (30-40cm). It’s easier to control and less likely to hit the bottom.
- Front Wing: Go for a large, low-aspect wing (80cm² – 120cm²). This generates lift at lower speeds.
- Material: Aluminum is durable and cheaper; Carbon is lighter and more responsive. For beginners, Aluminum is often the best bet for durability.
The Leash: Don’t Be a Rocket
Never use a standard surf leash. You need a foil leash that attaches to your ankle or waist and has a quick-release mechanism. If you fall, the board shouldn’t fly back at you like a bomerang.
👉 Shop Beginner Foil Sets on:
- Amazon: Search for Beginner Hydrofoil Sets
- Brand Official: Axis Foils | Lift Foils | Naish
Comparison: Aluminum vs. Carbon Foils
| Feature | Aluminum Foil | Carbon Fiber Foil |
|---|---|---|
| Durability | ✅ High (Bends, doesn’t snap) | ❌ Low (Can shatter on impact) |
| Weight | ❌ Heavier (Harder to lift) | ✅ Lighter (Easier to maneuver) |
| Cost | ✅ Affordable | ❌ Expensive |
| Performance | Good for learning | Excellent for advanced tricks |
| Best For | Beginers, rocky bottoms | Pros, smooth water |
For more detailed reviews on specific gear, visit our Hydrofoil Equipment Reviews section.
🚀 10 Critical Steps to Master Your First Hydrofoil Takeoff
Ready to fly? This is the moment you’ve been waiting for. But remember, the video you saw earlier mentioned a crucial detail: “Don’t wait for the foil to lift before you pop to your feet.” Here is the step-by-step breakdown to get you airborne without face-planting.
- Positioning: Place your feet shoulder-width apart, but shift your weight forward. Your front foot should be near the front of the board, and your back foot near the tail.
- The Pop-Up: As the wave catches you, pop up imediately. Do not wait for the board to rise. Stand up in one fluid motion.
- Stance Adjustment: Once standing, lean slightly forward. Your knees should bent, acting as shock absorbers.
- Find the “Sweet Spot”: This is the tipping point. If you feel the board lifting, you’re there. If you feel the nose diving, shift weight back slightly. If the tail lifts (breaching), shift weight forward.
- Look Ahead: Don’t look at your feet! Look at the horizon. Your body follows your eyes.
- Speed Maintenance: Paddle hard or pump the board to maintain speed. Speed is lift.
- Micro-Adjustments: Use your ankles and knees to steer. Small movements make big differences.
- The First Glide: Once you’re up, relax. Tension kills flow. Let the foil do the work.
- Turning: To turn, lean into the turn. The foil will carve. Don’t try to pivot the board like a snowboard.
- The Landing: To stop, shift your weight forward to submerge the foil, or simply let the wave die out.
Pro Tip: If you keep nosing diving, you are likely too far back. If you keep breaching, you are too far forward. It’s a constant balancing act.
For advanced maneuvers once you’ve mastered the takeoff, check out our Advanced Hydrofoiling Techniques.
🧘 ♂️ Finding Your Balance: Stance, Posture, and Weight Distribution
Balance on a foil is nothing like balance on a surfboard. On a surfboard, you are riding the water. On a foil, you are riding air (well, the air pressure created by the water).
The Offset Stance
Most beginners try to stand with feet parallel to the board’s centerline. Wrong.
- The Technique: Your feet should be offset. The front foot should be closer to the heel rail, and the back foot closer to the toe rail. This gives you better leverage to control the foil’s pitch and roll.
- Why? This stance allows you to use your legs as independent levers to adjust the angle of attack.
Posture: The “Athletic Crouch”
- Knees: Always bent. Think of a basketball player ready to jump.
- Back: Straight, but relaxed. Hunching over kills your balance.
- Arms: Out for balance, but not flailing. Use them like a tightrope walker.
Common Balance Mistakes
- The “Stiff Leg” Syndrome: Locking your knees is a recipe for a wipeout. Keep them springy.
- The “Head Down” Error: Looking at the water confuses your inner ear. Look up!
- The “Back Foot Dominance”: This is the most common mistake. It causes the foil to breach. Trust your front foot.
🌬️ Reading the Waves: How to Choose the Perfect Conditions for Foiling
Not all waves are created equal for foiling. In fact, some waves that are perfect for traditional surfing are terrible for foiling.
Ideal Conditions
- Wave Type: Soft, crumbly waves are best. Avoid steep, hollow barrels until you are advanced.
- Wind: Light to moderate wind (5-15 knots) is great for wing foiling. For prone foiling, you want clean, organized swells.
- Water Depth: Shallow water is dangerous. The foil can hit the bottom and snap. Look for deep water (at least 6-8 feet) for your first sessions.
- Crowds: Foils are fast and silent. Avoid crowded lineups. You don’t want to accidentally spear someone.
Reading the Swell
- Long Period Swells: These are your friends. They provide consistent, smooth energy.
- Short Period Chop: This is your enemy. It makes the foil unstable and hard to control.
For more on selecting the right board for your local conditions, visit our Hydrofoil Board Selection guide.
🤕 Safety First: Common Mistakes, Wipeouts, and How to Fall Safely
Let’s be real: Falling is part of the process. But falling on a foil is different. You are flying 2-3 feet above the water, and the foil is a sharp piece of metal.
How to Fall Safely
- Don’t Fight It: If you feel you’re going down, let go. Don’t try to save the ride.
- Cover Your Head: Tuck your chin and protect your head with your arms.
- Distance Yourself: As soon as you hit the water, swim away from the board. The board will fly back up, and the foil will be underwater.
- The “Dead Man’s Float”: If you can’t swim away, float on your back and let the board drift.
Common Mistakes
- Mistake 1: Riding in crowded spots. Foils are silent and fast. You can’t hear a surfer coming.
- Mistake 2: Using the wrong leash. A standard leash can wrap around your leg or the foil. Use a foil-specific leash.
- Mistake 3: Ignoring the wind. Wind can catch your board and send it flying. Always check the wind direction.
Real Story: “I once tried to save a ride in a crowded lineup. I lost my balance, the board flew back, and the foil sliced my calf. It was a painful lesson in etiquette and safety.” — Sarah, Hydrofoiling™ Instructor
🔋 Electric vs. Manual: Choosing Between E-Foils and Traditional Wing Foils
One of the biggest debates in the community: E-Foil or Wing Foil?
E-Foils (Electric Hydrofoils)
- Pros: No waves needed. You can foil in a lake, river, or flat ocean. The motor provides consistent speed. Great for beginners to learn balance without worrying about paddling.
- Cons: Expensive. Heavy. Battery life limits session time. Not a “surfing” experience.
- Best For: Flat water, beginners, those who want to foil anywhere.
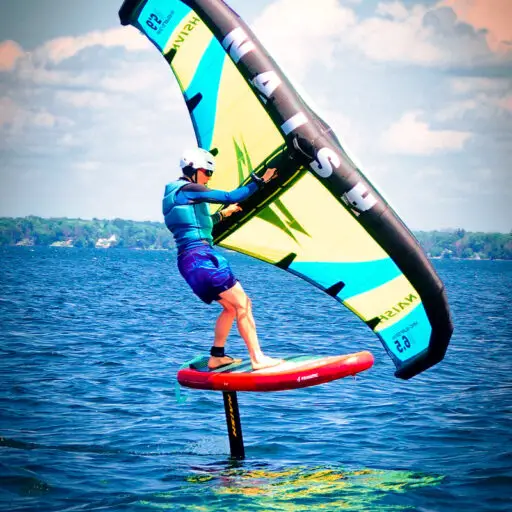
Wing Foils (Manual)
- Pros: Pure surfing experience. No batteries. Lightweight. Can ride waves.
- Cons: Steper learning curve. Requires waves or wind. Harder to get started.
- Best For: Surfers, wind sports enthusiasts, those who want the full experience.
Comparison Table
| Feature | E-Foil | Wing Foil |
|---|---|---|
| Power Source | Battery | Human (Paddle/Wind) |
| Learning Curve | Moderate | Step |
| Cost | High ($$) | Moderate ($) |
| Versatility | High (Flat water) | Medium (Needs wind/waves) |
| Fun Factor | High | Very High |
For more on competitions and the competitive side of these sports, check out our Hydrofoil Competitions section.
🏄 ♀️ From Flat Water to Swell: Progression Strategies for New Foilers
So you’ve got the basics down. Now what? The progression from flat water to real waves is a journey.
Phase 1: Flat Water Mastery
- Goal: Ride for 10+ minutes without falling.
- Focus: Balance, turning, and speed control.
- Tip: Practice in a calm lake or bay.
Phase 2: Small Swells
- Goal: Catch small, soft waves.
- Focus: Timing the takeoff and maintaining speed.
- Tip: Start with waves that are 1-2 feet high.
Phase 3: Real Surf
- Goal: Ride larger, more powerful waves.
- Focus: Reading the wave, positioning, and advanced maneuvers.
- Tip: Don’t rush. Master the small stuff first.
Remember: “The foil is a tool to maneuver the foil.” — Featured Video Insight
🔧 Maintenance 101: Keeping Your Hydrofoil Foil in Peak Condition
Your foil is an investment. Treat it right, and it will last for years.
Cleaning
- Rinse: Always rinse with fresh water after every session. Salt water is corrosive.
- Dry: Dry the foil thoroughly before storing.
- Inspect: Check for cracks, loose screws, or damage to the wings.
Storage
- Temperature: Store in a cool, dry place. Avoid extreme heat.
- Position: Store the foil horizontally or vertically, but not under heavy weight.
Common Issues
- Lose Screws: Check the fuselage and wing connections regularly.
- Dents: Small dents are okay, but large ones can affect performance.
- Corosion: If you see rust, clean it immediately with a wire brush and apply a protective coating.
🏁 Conclusion

So, are you ready to leave the water behind and touch the sky? Hydrofoiling is more than just a sport; it’s a mindset. It requires patience, persistence, and a willingness to fail. But the moment you finally glide above the water, feeling the silence and the freedom, you’ll know it was all worth it.
Our Final Recommendation:
If you are a complete beginner, start with a high-volume board and a large, low-aspect foil. Don’t skimp on safety gear. And most importantly, enjoy the process. The journey is just as rewarding as the destination.
Whether you choose the electric path of the E-Foil or the raw challenge of the Wing Foil, remember that every pro was once a beginner who fell a thousand times. Keep paddling, keep popping up, and keep flying.
🔗 Recommended Links
Ready to get your gear? Here are our top picks for beginners:
- Beginer Foil Boards:
Gong Glide: Amazon Search | Gong Official
Naish SlingWing: Amazon Search | Naish Official - Safety Gear:
Impact Vest: Amazon Search
Helmet: Amazon Search - Books:
The Art of Foiling (Available on Amazon)
❓ FAQ

What is the best hydrofoil board for beginners?
The best board for beginners is one with high volume (10L+) and a wide deck. Brands like Gong, Naish, and Axis offer excellent beginner-friendly models. Avoid low-volume, high-performance boards until you have mastered the basics.
Read more about “🚀 Mastering Hydrofoil Lift-to-Drag Ratio: The Ultimate Guide (2026)”
How do I get up on a hydrofoil for the first time?
To get up, you must pop up before the foil lifts. Shift your weight forward, keep your knees bent, and look ahead. Practice in flat water first to get the feel of the balance.
Read more about “🌊 What is Hydrofoiling? The Secret to Flying on Water (2026)”
What speed do I need to start foiling?
You need enough speed to generate lift, but not so much that you lose control. Generally, 8-12 mph is a good starting range. The key is consistent speed, not maximum speed.
Read more about “🚀 Hydrofoil Wing Design Advancements: The 2026 Revolution”
How do I fall safely while learning to foil?
When you fall, let go of the board, cover your head, and swim away. Never try to save the ride if you feel you’re losing control. Always wear a helmet and impact vest.
Read more about “🚀 7 Pro Tips for Hydrofoiling: Fly High in 2026”
What are common mistakes beginners make when foiling?
Common mistakes include:
- Waiting too long to pop up.
- Putting too much weight on the back foot.
- Looking down at the water.
- Riding in crowded areas.
Read more about “🚀 7 Core Strength Exercises for Hydrofoil Foiling (2026)”
How long does it take to learn hydrofoiling?
It varies, but most beginners can get up and ride for short periods within 3-5 sessions. Mastering turns and riding waves can take months of practice. Consistency is key.
Read more about “How long does it take to learn hydrofoiling?”
What safety gear do I need for beginner foiling?
Essential gear includes:
- Helmet: To protect your head from impacts.
- Impact Vest: To protect your torso and help you float.
- Foil Leash: To prevent the board from flying back at you.
- Wetsuit: Depending on the water temperature.
Read more about “🚀 15 Best Hydrofoils for Sale (2026): The Ultimate Flight Guide”
📚 Reference Links
- Axis Foils: Official Website
- Lift Foils: Official Website
- Naish: Official Website
- Progression Project Forum: Beginer Advice Thread
- Barts.com: Hydrofoil Surfing: The Ultimate Beginner’s Guide
- Hydrofoiling.org: Hydrofoiling Basics