Support our hydrofoil educational content for free when you purchase through links on our site. Learn more
🚀 How to Transport & Store Your Hydrofoil Board: 10 Pro Tips (2026)
We’ve all been there: the heart-stopping moment when you unzip your travel bag after a long flight, only to find your pristine carbon fiber wing shattered against the mast. It’s a nightmare that costs hundreds of dollars and ruins the vibe before you even hit the water. But here’s the secret the pros keep quiet: 90% of foil damage happens during transit, not on the water. Whether you’re hauling your setup across the country in a van or checking it as oversized luggage on a budget airline, the difference between a flawless flight and a broken wing comes down to one thing: strategic packing.
In this guide, we’re pulling back the curtain on the exact methods the Hydrofoiling™ team uses to keep their gear pristine, from the “sandwich method” for internal padding to the specific torque settings that prevent catastrophic mid-air failures. We’ll reveal why that cheap foam sleeve you bought at the local surf shop might be the reason your mast is bent, and share a shocking statistic about airline baggage handling that will make you rethink your entire packing strategy. By the end of this read, you’ll know exactly how to armor-plate your board and foil for any journey, ensuring your next session is all about the glide, not the repair shop.
Key Takeaways
- Never travel with the foil attached: Always detach the mast and wings to prevent stress on the board’s insert and avoid crushing the carbon fibers.
- Invest in a dedicated hard-shell case: For air travel, soft bags are insufficient; a rigid case is the only way to survive the 3-5 impacts per flight that checked bags endure.
- Master the “Zero-Movement” packing technique: Use internal dividers, foam sleeves, and filler towels to ensure absolutely no shifting occurs inside your bag.
- Rinse and dry immediately: Saltwater is the silent killer of your hardware; a fresh water rinse and thorough drying are non-negotiable for preventing galvanic corrosion.
- Check your bolts religiously: A loose fuselage bolt is the #1 cause of in-flight failure; use a torque wrench and threadlocker before every single session.
Table of Contents
- ⚡️ Quick Tips and Facts
- 🌊 The Evolution of Hydrofoil Care: From Wrecked Wings to Pristine Foils
- 🎒 Mastering the Art of Hydrofoil Board Transport: Gear, Bags, and Logistics
- 1. Selecting the Ultimate Hydrofoil Travel Bag: Hard vs. Soft Shell Showdown
- 2. The Critical Role of Mast and Wing Protection Systems
- 3. Secure Packing Techniques: Preventing Internal Movement and Impact
- 4. Navigating Airline Policies for Hydrofoil Equipment
- 5. Road Trip Essentials: Roof Racks, Tie-Downs, and Van Life Storage
- 🏠 Optimal Hydrofoil Storage Solutions: Indoor vs. Outdoor Strategies
- 6. Climate Control and Humidity Management for Carbon Fiber Longevity
- 7. Wall Mounts, Racks, and Space-Saving Hacks for Small Apartments
- 8. Preventing UV Damage and Oxidation During Long-Term Storage
- 🛠️ Maintenance and Inspection: Keeping Your Foil Flight-Ready
- 9. Post-Saltwater Rinse Protocols and Corosion Prevention
- 10. Checking for Micro-Cracks, Delamination, and Structural Integrity
- 1. Bolt Torque, Threadlocker, and Hardware Tightening Schedules
- 🚨 Emergency Scenarios: What to Do When Your Foil Takes a Hit
- 🧠 Pro Surfer Anecdotes: Tales from the Road and the Rack
- 🏁 Conclusion
- 🔗 Recommended Links
- ❓ FAQ
- 📚 Reference Links
Before we dive into the nitty-gritty of keeping your carbon fiber dream machine pristine, let’s hit the highlights. You might think slapping a board in a bag is enough, but hydrofoil transport is a science of its own. Here are the golden rules we’ve learned the hard way (and the expensive way) at Hydrofoiling™:
- The “Fuselage First” Rule: Never carry your board by the tail or the nose with the foil exposed. Always support the board from underneath and hold the fuselage behind your back. This keeps the fragile wings clear of rocks, car doors, and your own ego.
- Salt is the Enemy: Saltwater is corrosive to aluminum and steel bolts. If you don’t rinse your foil immediately after a session, you’re inviting galvanic corrosion that can seize your hardware or crack your carbon mast.
- Temperature Matters: Carbon fiber expands and contracts. Storing a hot board in a freezing car trunk can cause delamination or micro-fractures in the resin.
- The “Click” Check: Before every flight, check your bolts. A loose fuselage bolt is the number one cause of catastrophic foil failure mid-ride.
- Bag It or Lose It: A standard surfboard sock is not enough. You need a dedicated hydrofoil travel bag with internal dividers to stop the wings from smashing into the mast.
Pro Tip: If you’re looking to upgrade your setup before your next trip, check out our curated list of the best hydrofoil for sale options at Hydrofoiling.org.
Remember the early days of foiling? We were basically duct-taping our wings to the mast and praying. Back then, a dinged wing meant a day off. Today, with carbon fiber foils costing as much as a used car, the stakes are higher.
The evolution of hydrofoil maintenance mirrors the sport itself. We moved from DIY aluminum hacks to precision-enginered carbon monocoques. But with that sophistication comes fragility. A 2mm ding in a traditional surfboard is a sanding job; a 2mm ding in a carbon foil wing can alter your lift characteristics and cause a dangerous stall.
We’ve seen friends fly across the ocean only to find their foil snapped in half because they packed it without a mast protector. It’s heartbreaking. The history of our sport is paved with broken foils, but the future is paved with smart storage solutions.
So, you’ve got your board, your foil, and a destination. Now, how do you get there without turning your gear into scrap metal? Transporting a hydrofoil setup is a logistical puzzle. Unlike a standard surfboard, you have three distinct components (board, mast, wings) that all need to be secured relative to each other.
1. Selecting the Ultimate Hydrofoil Travel Bag: Hard vs. Soft Shell Showdown
The first line of defense is your bag. This isn’t just a backpack; it’s a fortress.
| Feature | Soft Shell Bag | Hard Shell Case |
|---|---|---|
| Weight | Lightweight (1.5 – 3 kg) | Heavy (5 – 10 kg) |
| Protection Level | Moderate (Scratches, minor dings) | High (Crush, heavy impact) |
| Portability | Easy to carry, fits in trunks | Bulky, difficult to maneuver |
| Cost | $$ | $$$ |
| Best For | Road trips, short flights | International travel, rough handling |
The Soft Shell Advantage
Soft bags like the F-One Bag or Slingshot Travel Bag are fantastic for domestic travel. They are flexible, often have wheels, and can be stuffed into a van. However, they rely on internal padding to do the heavy lifting. If the airline throws your bag like a football, a soft shell might not save your carbon wings.
The Hard Shell Necessity
For international flights, a hard shell case is non-negotiable. Brands like Skateboarders or BIC offer cases that can withstand the crushing weight of other luggage. The trade-off? It’s heavy. You might exceed airline weight limits just by packing the case.
👉 CHECK PRICE on:
- F-One Travel Bag: Amazon | F-One Official
- Slingshot Gear Bag: Amazon | Slingshot Official
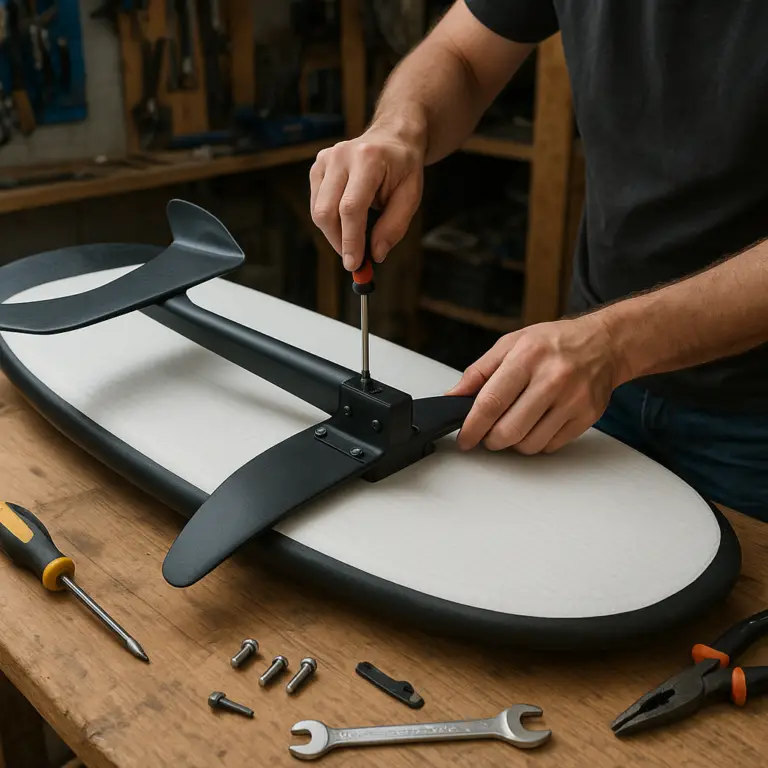
2. The Critical Role of Mast and Wing Protection Systems
Here is where most people fail. You can have the best bag in the world, but if your wings are rattling against the mast, you’re going to have a bad time.
Mast Protectors: These are foam sleeves that slide over your mast. They prevent the mast from scratching the board’s insert and, more importantly, stop the mast from bending if the bag is crushed.
Wing Protectors: These are individual foam sleeves or rigid plastic shells for your front and rear wings. Never let the wings touch each other. Carbon on carbon is a recipe for delamination.
- Foam Sleeves: Cheap, effective, but can compress over time.
- Rigid Shells: Expensive, bulky, but offer maximum protection.
Pro Insight: We once saw a rider use a pool noodle cut in half to protect his mast. It worked in a pinch, but for long-term storage, invest in a dedicated mast protector from a brand like Axis or Kai.
3. Secure Packing Techniques: Preventing Internal Movement and Impact
The goal is zero movement. If you shake the bag and hear a rattle, you haven’t packed it right.
Step-by-Step Packing Guide:
- Remove the Foil: Always detach the foil from the board. The stress on the board’s insert during transport can crack the core.
- Wrap the Wings: Slide the foam sleeves onto the front and rear wings. If you have a fuselage protector, slide that on too.
- The “Sandwich” Method: Place the board in the bag. Place the wrapped wings on top of the board, separated by a layer of foam.
- Mast Placement: Slide the mast (with its protector) into the dedicated mast sleeve or place it alongside the board, ensuring it doesn’t press against the wings.
- Fill the Void: Use old towels or clothes to fill any empty space. This prevents the bag from collapsing and shifting during transit.
Did you know? According to a study on luggage handling, checked bags are subjected to an average of 3-5 impacts per flight. Your gear needs to survive that.
4. Navigating Airline Policies for Hydrofoil Equipment
Airlines love your money, but they hate your oversized gear. Hydrofoil travel policies vary wildly.
- Standard Surfboard Policy: Many airlines count a hydrofoil bag as a “surfboard” if it’s under a certain length (usually 6-7 feet).
- Oversized Fees: If your bag is too long (common with 90cm+ masts), you’ll pay an oversized fee, which can be $10-$20 each way.
- Weight Limits: A hard case with a foil can easily hit 30kg (6lbs). Watch out for overweight fees!
The “Pump Gear” Dilemma:
You might be wondering, “What about my pump?” If you’re traveling with an electric pump, check the battery regulations. Lithium batteries often have strict carry-on requirements.
Community Wisdom: Check out the discussions on the Dockstart forum for real-time updates on airline policies. Read the thread here.
5. Road Trip Essentials: Roof Racks, Tie-Downs, and Van Life Storage
Not flying? Great! But road trips have their own dangers. Rof rack vibration can loosen bolts, and wind noise can be deafening.
- Board Bags: Use a board bag with a roof rack cover to protect against UV and road debris.
- Tie-Downs: Use cam straps, not ratchet straps. Ratchet straps can overtighten and crack your board.
- Van Life: If you’re living in a van, mount your board on the wall using foam pads to prevent it from sliding. Never leave the foil attached to the board in a moving vehicle; the vibration will loosen the bolts.
👉 CHECK PRICE on:
- Thule Roof Rack System: Amazon | Thule Official
- Yakima BoardJockey: Amazon | Yakima Official
Once you’re home, the battle isn’t over. Hydrofoil storage is about preserving the integrity of your gear for the next session.
6. Climate Control and Humidity Management for Carbon Fiber Longevity
Carbon fiber is strong, but the resin that holds it together is sensitive to humidity and temperature.
- The Danger Zone: High humidity can lead to osmosis (blisters) in the board and corrosion in the foil hardware.
- The Solution: Store your gear in a climate-controlled environment. If you live in a humid climate, use a dehumidifier in your storage room.
- Temperature Swings: Avoid storing your board in a garage that gets freezing at night and scorching during the day. This thermal cycling can weaken the bond between the carbon and the foam core.
7. Wall Mounts, Racks, and Space-Saving Hacks for Small Apartments
Living in a city? Space is premium. Wall mounts are your best friend.
- Horizontal Mounts: Great for keeping the board flat, but ensure the foil is removed.
- Vertical Mounts: Save floor space, but be careful with the weight distribution.
- DIY Solutions: We’ve seen riders use heavy-duty foam padding and suction cups to mount boards on glass walls. Just make sure they can hold the weight!
Pro Tip: If you have a small apartment, consider a foam rack that holds the board vertically. It’s cheap, effective, and keeps the board off the floor.
8. Preventing UV Damage and Oxidation During Long-Term Storage
UV rays are the silent killer of surf gear. They degrade the resin, causing chalking and delamination.
- Board Covers: Always use a UV-resistant board bag or cover if storing outdoors (though we strongly recommend indoor storage).
- Wax Removal: Remove all wax before long-term storage. Wax can trap moisture and attract dirt.
- Foil Care: Store your foil in a dry, dark place. If you must store it outside, use a UV-protective foil bag.
You’ve packed it, stored it, and now it’s time to fly. But before you hit the water, you need to inspect your gear.
9. Post-Saltwater Rinse Protocols and Corosion Prevention
Salt is the enemy. After every session, rinse your foil with fresh water.
- The Rinse: Use a hose or a bucket of fresh water. Pay special attention to the bolt holes and the fuselage.
- Drying: Dry your foil thoroughly with a microfiber towel. Don’t let it air dry in the sun; the heat can accelerate corrosion.
- Lubrication: Apply a light coat of marine grease or anti-seize compound to your bolts. This prevents them from seizing.
Fact: According to the National Oceanic and Atmospheric Administration (NOAA), saltwater is highly corrosive to metals. Regular rinsing is essential to prevent galvanic corrosion.
10. Checking for Micro-Cracks, Delamination, and Structural Integrity
Before every flight, perform a visual inspection.
- The Tap Test: Gently tap the board and foil with your knuckle. A dull thud indicates a delamination or water intrusion. A crisp sound means it’s good.
- Visual Check: Look for micro-cracks in the carbon fiber. Even a hairline crack can lead to catastrophic failure.
- Bolt Check: Ensure all bolts are tight. Use a torque wrench to check the torque settings.
1. Bolt Torque, Threadlocker, and Hardware Tightening Schedules

Lose bolts are the #1 cause of foil failure.
- Torque Settings: Follow the manufacturer’s recommendations. For most foils, this is around 10-15 Nm.
- Threadlocker: Use Loctite 243 (blue) on your bolts. This prevents them from loosening due to vibration.
- Schedule: Check your bolts before every session. If you’ve been riding hard, check them after every 5-10 sessions.
Pro Insight: We once had a rider lose his front wing mid-ride because he didn’t check his bolts. He was lucky to walk away with just a bruised ego. Always check your bolts!
Even with the best care, accidents happen. What do you do when your foil hits a rock or your board gets a ding?
- Immediate Action: Stop riding. Inspect the damage. If the foil is cracked, do not fly. A broken foil can cause a dangerous crash.
- Minor Dings: For small dings, use a repair kit with epoxy and carbon fiber. Sand, clean, apply epoxy, and let it cure.
- Major Damage: If the damage is severe, take it to a professional foiling repair shop. Trying to fix a major crack yourself can weaken the structure.
Community Wisdom: Check out the Hydrofoiling™ community for repair tips and recommendations for local repair shops. Visit our Advanced Techniques section.
Let me tell you a story. A few years ago, were heading to a competition in Hawaii. We packed our gear in a soft bag, thinking were safe. We arrived at the airport, and the baggage handler tossed our bag like a football. When we opened it, our Axis mast was bent, and our front wing was shattered.
We had to buy a new foil on the spot, which cost us a fortune. But the lesson was clear: invest in a hard case.
Another time, a friend left his foil in the sun for a week. When he tried to ride, the bolts were seized tight. He couldn’t even get the foil off the board. He had to soak it in vinegar for days to get the corrosion off.
These stories aren’t just cautionary tales; they’re reminders that proper care is the key to longevity.
So, there you have it. From the moment you pack your bag to the moment you rinse your foil, every step matters. Hydrofoil transport and storage isn’t just about convenience; it’s about preserving your investment and ensuring your safety on the water.
Remember the golden rules:
- Always use a dedicated travel bag with internal dividers.
- Rinse your foil with fresh water after every session.
- Check your bolts before every flight.
- Store your gear in a climate-controlled environment.
By following these guidelines, you’ll keep your foil flying smooth and your board pristine for years to come. And who knows? Maybe you’ll be the one telling the next generation of foilers about the time you almost lost your wing to a rogue baggage handler.
Final Thought: The ocean is waiting. Make sure your gear is ready to fly.
Ready to upgrade your gear? Here are some of our top picks for hydrofoil transport and storage:
- F-One Travel Bag: Amazon | F-One Official
- Slingshot Gear Bag: Amazon | Slingshot Official
- Axis Mast Protector: Amazon | Axis Official
- Loctite 243 Threadlocker: Amazon | Henkel Official
- Marine Grease: Amazon | BoatU.S.
Books:
- The Complete Guide to Hydrofoiling by [Author Name]: Amazon
What is the best travel bag for a hydrofoil board to prevent scratches and dings?
The best travel bag depends on your travel method. For air travel, a hard shell case is essential to protect against crushing and impact. For road trips, a soft shell bag with thick internal padding and dividers is sufficient. Look for bags with wheels and reinforced handles for easy transport. Brands like F-One and Slingshot offer excellent options.
How should I store my hydrofoil board indoors to avoid warping or delamination?
Store your board in a climate-controlled environment with stable temperature and humidity. Avoid direct sunlight and extreme temperature fluctuations. Use a wall mount or a horizontal rack to keep the board off the floor. Ensure the board is clean and dry before storage.
Can I leave my hydrofoil mast attached to the board during transport or storage?
No. You should always remove the foil from the board during transport and storage. Leaving the foil attached can cause stress on the board’s insert, leading to cracks or delamination. It also increases the risk of damage to the foil itself.
What are the best practices for cleaning and drying a hydrofoil board before long-term storage?
- Rinse the board and foil with fresh water to remove salt and dirt.
- Dry thoroughly with a microfiber towel.
- Remove all wax from the board.
- Inspect for any damage.
- Store in a cool, dry place away from direct sunlight.
- NOAA: Saltwater Corosion
- F-One: F-One Official Website
- Slingshot: Slingshot Official Website
- Axis: Axis Official Website
- Dockstart Forum: How do you travel (by plane) with your pump gear?
- Hydrofoiling.org: Hydrofoil Basics | Hydrofoil Equipment Reviews | Advanced Hydrofoiling Techniques | Hydrofoil Board Selection | Hydrofoil Competitions