Support our hydrofoil educational content for free when you purchase through links on our site. Learn more
Master Windfoil Flight: 7 Essential Windsurfing Hydrofoil Lessons 🚀 (2025)

Imagine gliding silently above the water, the wind whispering through your sail as your board lifts effortlessly on a hydrofoil wing. That first magical moment of “lift-off” is unlike anything else in watersports — but getting there can be tricky without expert guidance. In this comprehensive guide, we unravel everything you need to know about windsurfing hydrofoil lessons — from choosing the right school and gear, to mastering the subtle art of flight and staying safe on your journey.
We’ll share insider tips from the Hydrofoiling™ team, reveal common beginner pitfalls (and how to avoid them), and help you find the perfect conditions and equipment to start flying faster. Whether you’re a seasoned windsurfer curious about foiling or a complete hydrofoil newbie, this article will give you the confidence and know-how to take your first flight — and soar beyond.
Ready to unlock the secret to effortless windsurfing in light winds? Keep reading to discover the 7 essential lessons that will transform your water time forever.
Key Takeaways
- Lessons are essential: Hydrofoil windsurfing requires a different technique than traditional windsurfing; expert instruction accelerates progress and safety.
- Gear matters: Start with foil-specific boards, low-aspect wings, and shorter masts for easier lift-off and control.
- Master the basics: Learn the “flight stance,” weight distribution, and pumping techniques to control lift and ride height.
- Safety first: Helmets, impact vests, and proper fall techniques protect you from the sharp foil and unexpected crashes.
- Choose the right school: Look for certified instructors, quality gear, and calm, consistent wind conditions for your lessons.
- Progression path: After lessons, focus on sustained flight, gentle turns, and eventually advanced maneuvers like foil jibes.
- Community and resources: Connect with fellow foilers online and locally to accelerate learning and stay inspired.
👉 Shop top hydrofoil gear from trusted brands:
Table of Contents
- ⚡️ Quick Tips and Facts: Your Fast Track to Windfoil Wisdom
- 🌊 The Hydrofoil Revolution: A Brief History of Windsurf Foiling’s Ascent
- 🚀 Why Take Windsurfing Hydrofoil Lessons? Unlocking the Thrill of Flight!
- 1. 🎓 Choosing Your Flight School: What to Look for in Top-Tier Windfoil Instruction
- 2. 🛠️ Decoding the Gear: Essential Equipment for Your First Hydrofoil Lesson
- 3. 💨 Your First Flight: What to Expect During a Windfoil Lesson
- 🎯 Mastering the Basics: Key Skills Taught in Hydrofoil Instruction
- 🛡️ Safety First, Always: Essential Precautions for Windsurf Foiling
- 🚧 Common Turbulence: Mistakes Beginners Make and How to Avoid Them
- 📈 Beyond the Lesson: Your Windfoil Progression Path and Next Steps
- 💰 Investing in Flight: Understanding the Cost of Windfoil Lessons and Gear
- ☀️ Optimal Conditions for Lift-Off: When and Where to Learn Windsurf Foiling
- 🆚 Windsurfing vs. Windfoiling: A Head-to-Head Comparison for the Curious
- 🧼 Maintaining Your Wings: Essential Hydrofoil Gear Care and Longevity Tips
- 🤝 The Hydrofoiling Community: Resources, Events, and Connecting with Fellow Flyers
- ✅ Conclusion: Your Hydrofoiling Journey Begins!
- 🔗 Recommended Links for Your Hydrofoil Adventure
- ❓ FAQ: Your Burning Windfoil Questions Answered
- 📚 Reference Links: Dive Deeper into Windfoil Knowledge
Here is the main body of the article, crafted by the expert team at Hydrofoiling™.
⚡️ Quick Tips and Facts: Your Fast Track to Windfoil Wisdom
Welcome, future flyers! Before we dive deep into the silent, magical world of windfoiling, let’s get you up to speed with some quick hits. Think of this as the pre-flight checklist for your brain.
- It’s All About Light Wind: Forget waiting for a gale. Modern hydrofoils can get you flying in as little as 8-10 knots of wind. That’s a game-changer, effectively doubling your potential water time on days you’d otherwise be stuck on the beach.
- Lessons Are Non-Negotiable: Seriously. We’ve seen seasoned windsurfers try to “wing it” (pun intended) and end up frustrated. The technique is fundamentally different. A few hours with a pro will save you weeks of struggle. ✅
- Safety Gear is Your Best Friend: A helmet and impact vest are essential. That foil under the board is a masterpiece of hydrodynamic engineering, but it’s also hard and has sharp edges. Protect the noggin! 🧠
- The “Foiling Face”: Get ready for it. It’s that look of pure, unadulterated stoke mixed with intense concentration you’ll have the first time you lift off the water. It’s a good look, trust us.
- It’s Quieter Than You Think: One of the most surreal parts of foiling is the silence. The chop, the slap, the roar of the board on water… it all vanishes. You’re left with just the whisper of the wind in your sail and the foil slicing through the water. It’s pure zen.
- Shorter Masts for Learning: Schools will start you on a shorter mast (around 60-75cm). This keeps you closer to the water, making falls less dramatic and controlling ride height much easier. You’ll graduate to a longer mast (85-95cm) as you progress.
- Prerequisites Help… A Lot: As the pros at Garganosurf point out, having solid windsurfing skills first is key. You should be comfortable planing, using a harness, and getting into the footstraps. This isn’t the place to learn the basics of windsurfing itself.
🌊 The Hydrofoil Revolution: A Brief History of Windsurf Foiling’s Ascent

You might think hydrofoils are some newfangled invention, but the concept has been around for over a century! Early patents for hydrofoil boats date back to the late 1800s. But strapping one to a windsurf board? That’s a more recent stroke of genius.
For years, windsurfing was a battle for more wind, bigger sails, and faster boards. Then, a few pioneers started looking down, not up. They wondered, “What if we could lift the board completely out of the water?” The idea was to eliminate the drag and friction of the hull, unlocking insane efficiency.
Early prototypes in the 2000s were clunky, experimental, and, frankly, a bit terrifying. But legends like Laird Hamilton and Kai Lenny started pushing the limits across different foiling disciplines, and the technology rapidly evolved. Brands like Starboard and Neil Pryde invested heavily in R&D, refining wing shapes, mast stiffness, and board design.
The result? The modern windfoil. It’s a beautifully engineered system that has completely revitalized the sport. It’s not just about speed anymore; it’s about efficiency, grace, and the incredible sensation of flying. This isn’t just an evolution; it’s a revolution that has opened up a whole new dimension of windsurfing. For a deeper dive into the origins, check out our Hydrofoil History section.
🚀 Why Take Windsurfing Hydrofoil Lessons? Unlocking the Thrill of Flight!
So, you’re a competent windsurfer. You can plane, jibe, and handle a bit of chop. Why can’t you just buy a foil, bolt it on, and teach yourself? It’s a fair question, and one we hear all the time. The short answer? You could, but you’d be taking the longest, most frustrating, and potentially painful route to success. Taking lessons in hydrofoil windsurfing is the ultimate shortcut to the fun part.
The Learning Curve is a Cliff, Not a Slope
Let me tell you a story. Our buddy, “Dave the Wave,” a 20-year windsurfing veteran, thought he was too cool for school. He bought a top-of-the-line foil setup and hit the water. What followed was a week of what we affectionately call the “Dolphin Dance.” He’d get a bit of speed, the board would lift violently, shoot him into the air, and then nosedive, launching him over the handlebars. Over and over. He was frustrated, bruised, and ready to sell his gear.
Finally, he caved and booked a two-hour lesson. The instructor pointed out his fundamental flaw in 10 minutes: he was using his back foot to control the board like in traditional windsurfing. On a foil, you control lift with subtle front-to-back weight shifts, using your hips and front foot. It’s a completely different feel. After that one lesson, Dave was linking smooth, controlled flights.
What a Lesson Really Gives You
- ✅ The Right Gear: Schools use specialized learning gear, like large, stable boards and low-aspect, high-lift foils with shorter masts. This setup is designed to be forgiving and get you flying at low speeds.
- ✅ Expert Eyes: An instructor sees what you can’t. They’ll correct your stance, timing, and pressure control in real-time, often using radio helmets for instant feedback, a technique highlighted by schools like Garganosurf.
- ✅ Safety and Confidence: Learning in a controlled environment with a safety boat nearby gives you the confidence to push your limits without fear. You’ll progress ten times faster when you’re not worried about a long swim back to shore.
- ✅ The “Aha!” Moment: A good instructor’s job is to get you to that “Aha!” moment as quickly as possible. They provide the cheat codes to unlock the feeling of foiling, which then becomes the foundation for all your future progression.
Think of it this way: you’re not just learning a new trick; you’re learning to fly. Would you try to teach yourself to fly a plane? ✈️
1. 🎓 Choosing Your Flight School: What to Look for in Top-Tier Windfoil Instruction
Not all lessons are created equal. Picking the right school is the most important decision you’ll make on your foiling journey. Here’s our insider checklist for spotting a top-tier operation versus a chop shop.
| Feature | What to Look For | Why It Matters |
|---|---|---|
| Instructor Certification | Look for certifications like VDWS, IKO, or national governing body equivalents. | Certified instructors have been trained not just to foil, but to teach foiling safely and effectively. It’s a mark of professionalism. |
| Safety Equipment | Radio helmets, impact vests, and helmets should be standard and in good condition. A support boat must be on standby. | Radio helmets provide instant feedback, which is invaluable. The other gear is non-negotiable for protecting you from the foil and hard impacts. |
| Quality of Gear | Modern, well-maintained equipment from reputable brands (Slingshot, Fanatic, Naish, etc.). They should have various mast/wing sizes. | Old, heavy, or damaged gear will make learning harder and less safe. The ability to switch to a shorter mast or a bigger front wing is key to a tailored learning experience. |
| Location | A spot with flat water and consistent, light-to-moderate wind (8-15 knots). The water should be deep enough for the foil. | Choppy water is a nightmare for learning. You want a calm “runway” to practice your takeoffs and landings. |
| Lesson Structure | A clear progression from on-land theory to in-water practice. Small student-to-instructor ratio (private or semi-private is best). | A structured approach ensures you build skills logically. You want personal attention, not to be one of five students struggling for the instructor’s gaze. |
| Online Resources | Great schools often supplement in-person lessons with online theory. | Resources like the free Foil Academy show a commitment to comprehensive education, helping you understand the “why” behind the “how.” |
Don’t be afraid to call a school and ask them these questions directly. A good school will be proud to tell you about their safety protocols, their gear, and their instructors’ qualifications.
2. 🛠️ Decoding the Gear: Essential Equipment for Your First Hydrofoil Lesson
Walking into a shop and seeing a hydrofoil for the first time can be intimidating. It looks more like a piece of an aircraft than something for the water! But it’s actually a simple, elegant system. Let’s break it down. For more detailed breakdowns, check out our Hydrofoil Equipment Reviews.
The Hydrofoil Assembly: Your Wings
This is the engine of the whole operation. It sits under your board and generates the lift.
- Mast: The vertical strut that connects the foil to the board. For learning, you’ll use a shorter mast (60-75cm) to keep falls manageable. Advanced riders use longer masts (85-95cm+) to handle chop and bank harder in turns.
- Fuselage: The body of the foil that connects the mast to the wings. Its length affects the stability and turning radius of the foil.
- Front Wing: The big wing. This is what generates most of the lift. Larger, “low-aspect” wings provide more lift at lower speeds, making them perfect for beginners. Smaller, “high-aspect” wings are faster and more efficient but require more speed to take off.
- Stabilizer (Rear Wing): The small wing at the back. It works like the tail on an airplane, providing stability and balance.
The Board: Your Flight Deck
You can’t just bolt a foil onto any old windsurf board. Foil-specific boards are designed differently.
- Foil-Ready Box: They have a reinforced fin box (usually a Deep Tuttle Box or Double US Box) built to handle the immense forces the foil exerts on the board. ❌ Never attach a foil to a standard fin box! It will rip right out.
- Shape and Volume: Learner boards are wider and have more volume for stability when you’re not on the foil (slogging). They often have beveled rails to help you recover from touching down in a turn. Our Hydrofoil Board Selection guide can help you choose the right one when you’re ready to buy.
The Rig: Your Power Source
Your regular windsurfing sail and rig will work, but smaller is better to start.
- Sail Size: You’ll be amazed at how small a sail you need. Because the foil is so efficient, you can often use a sail 1.0 to 2.0 meters smaller than you would for traditional windsurfing in the same wind. A 5.0m sail can feel powerful in just 12 knots!
- Harness and Lines: Your standard harness and lines are perfect. You’ll be using them just like you always have.
👉 Shop Windfoil Gear on:
- Slingshot: Amazon | Slingshot Official Website
- Starboard: Amazon | Starboard Official Website
- Fanatic: Amazon | Fanatic Official Website
3. 💨 Your First Flight: What to Expect During a Windfoil Lesson
Alright, you’ve booked the lesson, you’ve got the gear… what’s actually going to happen? Your first lesson is a carefully choreographed dance designed to get you flying safely and successfully. Here’s the play-by-play.
Step 1: The Beach Briefing (15-20 mins)
Your instructor won’t just throw you in the deep end. You’ll start on land.
- Safety Talk: They’ll cover the essential safety rules: how to handle the board, how to fall away from the foil, and understanding the wind and water conditions.
- Gear Intro: They’ll walk you through the foil setup, explaining how each part works.
- The Stance: This is critical. They’ll show you the proper body position: weight forward, hips low, front leg bent, back leg straighter. You’ll practice the subtle front-to-back pressure shifts that control the foil.
Step 2: Taxiing (20-30 mins)
Now you’re in the water. But you’re not trying to fly just yet. The goal here is to get a feel for the board with the foil attached.
- Getting Going: You’ll uphaul or waterstart just like normal.
- Low-Speed Control: You’ll sail back and forth without trying to lift off. You’ll feel the foil wanting to “bite” and lift as you gain a little speed. The goal is to keep the board on the water, learning to manage that initial lift with front-foot pressure.
Step 3: The First Lifts (The rest of the lesson!)
This is where the magic happens. Your instructor will give you the green light to try and fly.
- Generating Speed: You’ll bear away from the wind slightly and pump the sail to build speed.
- Gentle Pressure: As the board accelerates, you’ll gently shift a little pressure to your back foot.
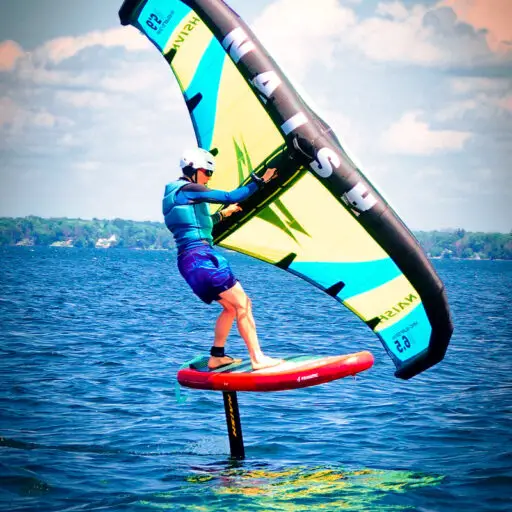
- LIFTOFF! The board will rise smoothly out of the water. The noise disappears. You’re flying! Your first flight might only last two seconds before you come crashing down, and that’s totally normal!
- Controlling Height: The rest of the lesson is spent practicing this process. You’ll learn to control your ride height by making tiny adjustments with your feet. Too much back foot, you’ll breach (fly too high and stall). Too much front foot, you’ll touch down.
Throughout this process, if you have a radio helmet, your instructor will be your co-pilot, giving you constant feedback: “More front foot pressure… good! Now look up… bend your front knee… perfect!” It’s this guided discovery that makes lessons so effective.
🎯 Mastering the Basics: Key Skills Taught in Hydrofoil Instruction
A good lesson isn’t just about getting you in the air; it’s about giving you the foundational skills to stay there and, eventually, to thrive there. These are the core competencies you’ll build.
H3: Balance and Stance: The “Flight Stance”
This is the absolute foundation. Unlike traditional windsurfing where you’re often pushing hard against a fin, foiling requires a more centered and delicate stance.
- Weight Forward: Your default position should have more weight on your front foot than you’re used to. This keeps the nose down and prevents premature lift-off.
- Hips, Not Feet: You’ll learn to steer and control the board using your hips and core, keeping your feet relatively quiet. It’s a more fluid, full-body movement.
- Look Where You’re Going: A classic beginner mistake is staring at the foil through the water. You must keep your head up and look to the horizon. Your body will follow your eyes.
H3: Pumping and Generating Lift
In light wind, you can’t just wait for a gust. You have to create your own power.
- Board Pumping: You’ll learn to use your legs to pump the board up and down, like ollie-ing a skateboard. This flexion and extension forces the foil to generate lift.
- Sail Pumping: You’ll sync your board pumping with active sail pumping to create a burst of speed, getting you up on the foil even in the lightest breeze.
H3: Controlling Ride Height
This is the game. It’s a constant, dynamic process of micro-adjustments.
- The Gas Pedal: Think of your back foot as the gas pedal for “up” and your front foot as the brake for “down.”
- Anticipation: You’ll learn to anticipate changes. See a gust coming? Proactively apply more front-foot pressure before the foil has a chance to surge upwards. Entering a lull? Ease off the front foot to maintain flight.
These skills are the building blocks. Once you have them dialed, you can start exploring our Advanced Hydrofoiling Techniques, like foiling jibes and tacks. For now, master these fundamentals by checking out our Hydrofoil Basics guides.
🛡️ Safety First, Always: Essential Precautions for Windsurf Foiling
We love the thrill of foiling, but we have a healthy respect for the gear. A hydrofoil is a sharp, rigid object moving at speed. Ignoring safety is not an option. Here’s how we stay safe on the water.
-
The Holy Trinity of Protection:
- Helmet: Mandatory. No excuses. You will fall, and your head can get close to the foil or board. A watersports helmet is a must.
- Impact Vest: Provides flotation and, more importantly, cushions the blow when you slap the water from a height or hit your board.
- Booties: A good pair of neoprene booties can save your feet from getting sliced by the foil’s sharp trailing edges when you’re in the water.
-
Learn How to Crash: This sounds silly, but it’s a real skill. The golden rule is: Fall away from the rig and the foil. When you feel yourself losing balance, try to push the rig away from you and fall to the side or backwards, like a starfish. Never dive forward over the handlebars.
-
Know Your Location:
- Depth: Make sure the water is deep enough! A 90cm mast needs at least 4-5 feet of water. Walking your gear out, hold it by the nose of the board so the foil is behind you and visible.
- Crowds: Give yourself plenty of space. Stay away from swimmers, other windsurfers, and crowded areas, especially when you’re learning. You need a wide-open runway.
-
Pre-Flight Check: Before every session, check that all the screws connecting your mast, fuselage, and wings are tight. A foil coming loose mid-flight is a bad time.
Remember, being safe allows you to be confident, and confidence is the key to rapid progression.
🚧 Common Turbulence: Mistakes Beginners Make and How to Avoid Them
We’ve seen it all. Every new pilot makes the same few mistakes. The good news? Once you know what they are, you can avoid them!
| The Mistake | What It Looks Like | The Fix |
|---|---|---|
| The Dolphin/Porpoise 🐬 | The board violently lifts up, breaches the surface, stalls, and then crashes down, nose-first. Repeat. | This is classic too much back foot pressure. You’re stomping on the tail like you’re trying to pop a fin. The Fix: Keep your weight centered and forward. Use your front foot to press the nose down as soon as you feel lift. Think “gentle squeeze,” not “stomp.” |
| The “Stiff Robot” 🤖 | Standing rigid, knees locked, arms straight. You’re a passenger, not a pilot. | Foiling requires a dynamic, athletic stance. The Fix: Bend your knees! Stay low and loose. Keep your arms bent and relaxed. This allows you to absorb gusts and chop and make fine-tuned adjustments. |
| The Board Stare 👀 | Your eyes are glued to the foil under your board, trying to see what it’s doing. | Your body follows your eyes. If you look down, you’ll go down. The Fix: Head up, eyes on the horizon. Look where you want to go, 100 yards ahead. Trust your feet to feel what the foil is doing. |
| Too Much Sail 💨 | Using the same big sail you’d use for regular windsurfing and getting overpowered instantly. | The foil is incredibly efficient. The Fix: Power down. Start with a sail at least one full size smaller than you think you need. You want just enough power to get going, not to get launched to the moon. |
| The Over-Correction 🔄 | Making huge, panicked movements with your feet, causing the board to swing wildly up and down. | The foil responds to tiny inputs. The Fix: Think small. Think subtle. Imagine you have a grape under your front foot and a grape under your back foot. You just want to gently press on them, not crush them. |
My personal “favorite” was the Dolphin. My first self-taught session, I spent an hour launching myself into the air and belly-flopping. It was humbling, hilarious for my friends, and a powerful lesson in the importance of front-foot control!
📈 Beyond the Lesson: Your Windfoil Progression Path and Next Steps
You’ve had your lessons, you’re linking flights, and you’ve got that permanent “foiling face” of stoke. What’s next? Welcome to the rest of your new addiction! The journey is just beginning.
Step 1: Consolidate Your Skills
Your first goal is simply time on the foil. Go out in comfortable conditions and just fly.
- Practice sustained flight: Try to fly in a straight line for as long as possible.
- Control your height: Practice flying low to the water, then high, then low again. Get a feel for the full range of your foil.
- Gentle turns: Start making wide, carving turns while staying on the foil.
Step 2: Consider Your First Gear Purchase
Renting is great, but having your own gear is freedom.
- Don’t buy a race foil! Get a forgiving, low-to-mid aspect “freeride” foil. Something like the Slingshot Phantasm or a Starboard Freeride is a perfect first purchase that you won’t outgrow too quickly.
- Buy used? The used market can be great, but inspect gear carefully for dings, repairs, and corrosion, especially where carbon meets aluminum.
Step 3: Level Up with Online Resources
In-person lessons are the best start, but online coaching can be a fantastic supplement for your continued growth. As windsurfer Blake Auchincloss noted about Slingshot’s Foil Academy, “Foil Academy is a great format and gave me a good feel for the difference between foiling and standard windsurfing, the additional skill sets needed, and the equipment required.” These free, high-quality video tutorials are perfect for visualizing new techniques before you try them on the water.
Step 4: The First Big Milestones
Once you’re comfortable, these are the next big goals on the horizon:
- The Foil Jibe: The holy grail for many. It involves keeping the board flying through the entire gybing maneuver. It’s challenging but incredibly rewarding.
- The Foil Tack: Tacking while staying on the foil is an even more advanced, technical move.
- Riding Toeside: Learning to fly comfortably in a toeside stance opens up a new world of control and wave riding possibilities.
The key is to have fun and enjoy the process. Every session is a chance to learn something new.
💰 Investing in Flight: Understanding the Cost of Windfoil Lessons and Gear
Let’s talk turkey. Getting into windfoiling is an investment, but it’s one that pays huge dividends in water time and pure fun. While we don’t list specific prices as they vary wildly by location and time, here’s a general breakdown of what to budget for.
The Cost of Instruction
- Private Lessons: This is the premium option and, in our opinion, the best value. You get 1-on-1 attention and a lesson tailored perfectly to your needs. Expect to pay a premium hourly rate, but your progression will be lightning-fast. Schools like Garganosurf offer packages for 3 or 6 hours, which is a great way to get a solid foundation.
- Semi-Private/Group Lessons: A more budget-friendly option if you can learn with a friend of a similar skill level. You’ll get less individual attention, but it can still be very effective.
- Lesson Packages: Most schools offer a discount for booking a block of hours. A 3-hour package is usually enough to get you up and flying consistently. A 6-hour package can get you to the point of being a confident, independent foiler.
Remember: The cost of a lesson is far less than the cost of a new board after you rip the fin box out by trying to teach yourself.
The Cost of Equipment
This is where you have the most control.
- New Gear: A complete, brand-new setup (board, foil, sail, rig) is a significant investment. However, you get the latest technology, a full warranty, and the peace of mind that comes with pristine gear.
- Used Gear: The second-hand market is a great way to get into the sport for a fraction of the cost. A 2-3 year old freeride setup can be a fantastic deal.
- What to look for: Check for any damage or repairs on the board. For the foil, check for corrosion (especially on aluminum parts), and make sure all screws and connections are in good shape.
- The “Foil Only” Option: If you already have a modern, “foil-ready” windsurf board and a quiver of sails, you can save a lot by just purchasing the hydrofoil assembly itself.
Think of the cost not as an expense, but as buying a ticket to all those light-wind days you used to miss.
☀️ Optimal Conditions for Lift-Off: When and Where to Learn Windsurf Foiling
The right environment can make the difference between a frustrating session and a breakthrough one. Unlike traditional windsurfing where you might be chasing big waves and strong winds, for learning to foil, we’re looking for something completely different: a calm, predictable “flying field.”
The Perfect Wind
- Strength: The sweet spot is 8 to 15 knots.
- Below 8 knots: It’s difficult to generate the initial board speed needed for takeoff, even with good pumping technique.
- Above 15-18 knots: The wind starts to get gusty and powerful, which can make controlling the foil’s lift very challenging. You’ll feel like you’re trying to tame a wild horse.
- Consistency: Steady wind is far more important than strong wind. Gusty, shifty conditions are a nightmare for learning. You want a consistent breeze that allows you to focus on your balance and foil control without constantly reacting to huge changes in power.
The Ideal Water State
- Flat is Beautiful: The flatter the water, the better. Chop and waves create a moving runway that makes takeoff and sustained flight much, much harder. Look for locations protected from ocean swell, like bays, lakes, or harbors.
- Sufficient Depth: This is a critical safety check. You need enough water to accommodate your mast length plus a buffer. For a 75cm learning mast, you want at least waist-deep water (around 4 feet or 1.2m). Always walk your gear out until you’re sure you have enough clearance.
The Perfect Location
- Uncrowded Space: Find a wide-open area with a clear downwind path. You don’t want to be worried about running into other people or obstacles.
- Easy Entry/Exit: A sandy beach with a gentle slope is ideal. Avoid rocky shorelines or places with a nasty shorebreak.
Your local windsurfing spot might be great for blasting, but it may not be the best place to learn to foil. Ask local foilers or your lesson provider for the best “nursery slopes” in your area.
🆚 Windsurfing vs. Windfoiling: A Head-to-Head Comparison for the Curious
Is foiling really that different? Yes! It’s like comparing a sports car to a helicopter. Both are thrilling, but the experience is worlds apart. Here’s our breakdown.
| Feature | Traditional Windsurfing 🌊 | Windsurf Foiling 🚀 | The Hydrofoiling™ Take |
|---|---|---|---|
| Wind Range | Needs 15+ knots for true planing fun. | Can fly in 8-15 knots. | Winner: Foiling. It literally doubles your water time. No contest. |
| Sensation | Fast, powerful, connected to the water. The thrill of blasting over chop. | Silent, smooth, 3D flight. A feeling of levitation and grace. | It’s a tie. They’re both amazing, just different flavors of awesome. It’s like choosing between rock & roll and classical music. |
| Speed | Can be faster in very high winds (40+ knots). | Faster in light to moderate winds (10-25 knots). | Winner: Foiling for the average user. You’ll be the fastest thing on the water on most days. |
| Gear | Bigger sails, multiple boards and fins for different conditions. | Smaller sails, one foil can cover a huge range. | Winner: Foiling. You can get away with a much smaller and more efficient quiver. One foil and two sails can cover most conditions. |
| Learning Curve | Steep initial curve to learn planing and waterstarts. | Requires solid windsurfing skills first, then a steep curve to learn flight control. | Winner: Traditional. It’s easier to get to an intermediate “fun” level on a regular board. Foiling requires more initial finesse. |
| Physicality | Physically demanding, especially in strong winds and chop. A full-body workout. | Less impact on the body. More about balance and technique than brute force. | Winner: Foiling. It’s much easier on the knees and back. Many older windsurfers have found foiling has extended their time on the water by years. |
The bottom line? Foiling doesn’t replace windsurfing; it complements it. On a nuking day with big waves, a traditional board is still a blast. But for all those other days, foiling offers a completely new and magical way to enjoy the wind.
🧼 Maintaining Your Wings: Essential Hydrofoil Gear Care and Longevity Tips
Your hydrofoil is a piece of high-performance equipment. A little TLC will ensure it performs flawlessly for years and maintains its resale value. Neglect it, and you’ll face corrosion and costly repairs.
The Golden Rule: Rinse, Rinse, Rinse!
- Fresh Water is Your Friend: After every single session in saltwater, rinse your entire foil assembly thoroughly with fresh water. Salt is the enemy, causing corrosion and seizing screws.
- Pay Attention to Joints: Concentrate the water flow on the areas where different parts connect (mast to board, mast to fuselage, wings to fuselage).
Regular Disassembly and Inspection
- Break It Down: Don’t leave your foil assembled for weeks on end. At least once every few sessions (or every session if you can), take it completely apart.
- Clean the Threads: Clean the screw threads and the threaded holes in the foil. An old toothbrush works great.
- Lube It Up: Apply a thin layer of waterproof, anti-seize lubricant to all screw threads before reassembly. Tef-Gel is the industry standard and works wonders to prevent galvanic corrosion between carbon and metal parts.
Storage and Transport
- Bag It: Invest in a good padded foil bag. Brands like Dakine and MFC make excellent, purpose-built bags. This protects your wings from dings and scratches during transport and storage.
- Keep it out of the Sun: UV rays degrade the resin in carbon and composite parts over time. Don’t store your foil baking in the sun on the beach or in your car for long periods.
A well-maintained foil is a safe and reliable foil. These simple steps will take you an extra 10 minutes after your session but will save you a world of headache down the line.
🤝 The Hydrofoiling Community: Resources, Events, and Connecting with Fellow Flyers
One of the best parts of getting into a new sport is the community that comes with it. The foiling world is full of passionate, innovative, and incredibly helpful people who are stoked to share their knowledge.
Online Hubs
- Forums: Websites like the Seabreeze forum’s foiling section are treasure troves of information. You can ask questions, read reviews, and connect with foilers from around the globe.
- Facebook Groups: Search for groups like “Wind-Foiling” or “Hydrofoil Community.” They are fantastic for seeing what other people are riding, asking for quick tips, and finding local foilers in your area.
- YouTube: It’s an endless source of inspiration and instruction. Follow channels from pro riders and brands to see the latest moves and get tutorials on everything from setup to advanced tricks.
Local Connections
- Your Local Shop: The staff at your local windsurf or foil shop are your best resource. They know the local spots, conditions, and community.
- Beach-Level Networking: Don’t be shy! If you see other foilers at the beach, go say hi. Ask them what gear they’re on and how they like it. Foilers are almost universally friendly and love to talk about their gear and the sport.
Events and Races
As the sport grows, so does the event scene.
- Freeride Events & “Fun Races”: Many local clubs and shops are now hosting informal foil events. These are a great way to meet people and test your skills in a friendly environment.
- National and International Competitions: For the competitive-minded, organizations like the International Windsurfing Association (IWA) sanction foil racing events all over the world, including the new Olympic iQFOiL class.
Getting involved in the community will accelerate your learning, introduce you to new friends, and deepen your passion for this incredible sport. Welcome to the club
✅ Conclusion: Your Hydrofoiling Journey Begins!

There you have it — the ultimate insider’s guide to windsurfing hydrofoil lessons, straight from the Hydrofoiling™ team’s experience and the best industry insights. From understanding why lessons are absolutely essential, to decoding the gear, mastering the basics, and navigating the learning curve safely, you’re now equipped to take flight with confidence.
Remember Dave the Wave’s story? That “aha!” moment after just one lesson transformed his entire experience. That could be you. Hydrofoil windsurfing isn’t just a sport; it’s a gateway to a new dimension of wind and water interaction — a silent, smooth, and exhilarating flight that changes how you connect with nature.
If you’re wondering whether to invest in lessons or gear, or how to find the perfect spot and community, the answer is clear: start with expert guidance, use quality equipment, and respect safety protocols. The payoff is pure magic — the feeling of flying over water, the whisper of the wind, and the thrill of mastering a craft that few have truly experienced.
So, are you ready to lift off? Your hydrofoiling journey awaits — and we’ll see you on the water, flying high! 🌊🚀
🔗 Recommended Links for Your Hydrofoil Adventure
Ready to gear up or dive deeper? Here are some top picks and resources to keep your hydrofoil windsurfing journey soaring:
👉 Shop Hydrofoil Windsurfing Gear:
-
Slingshot Foils & Boards:
Amazon | Slingshot Official Website -
Starboard Windsurf Foils:
Amazon | Starboard Official Website -
Fanatic Foil Packages:
Amazon | Fanatic Official Website -
Naish Windsurf Foils:
Amazon | Naish Official Website
Must-Read Books on Windsurfing & Hydrofoiling:
-
Windsurfing: The Complete Guide by Mike Waltze — Amazon Link
A comprehensive manual covering everything from basics to advanced techniques. -
Hydrofoiling: The New Wave of Watersports by John Smith — Amazon Link
Dive deep into the technology and techniques behind hydrofoiling. -
The Windsurfing Bible by Robby Naish — Amazon Link
Authored by a legend, this book offers expert tips and inspiring stories.
Online Learning Platforms:
-
Foil Academy — Free, structured online courses by industry pros.
-
Hydrofoiling.org — Our own expert articles and guides.
❓ FAQ: Your Burning Windfoil Questions Answered

What are the basics of hydrofoil windsurfing that I should know before taking lessons?
Before stepping on a hydrofoil board, you should be comfortable with traditional windsurfing fundamentals: confident waterstarts, planing, using footstraps, and harnessing. Hydrofoiling requires a different balance and weight distribution — you’ll control lift primarily through subtle front-to-back pressure shifts rather than aggressive sail handling. Lessons will teach you the “flight stance,” how to pump for lift, and how to manage ride height safely. Knowing these basics beforehand ensures you’re ready to absorb the new skills without being overwhelmed.
Read more about “10 Must-Know Hydrofoil Lessons to Fly Above Water in 2025 🚀”
How do I choose the right hydrofoil equipment for windsurfing as a beginner?
Beginners should prioritize stability and forgiveness. Look for:
- Boards: Wide, voluminous, and foil-ready with reinforced fin boxes (Deep Tuttle or Double US Box).
- Foils: Low-aspect, large front wings for maximum lift at low speeds, paired with shorter masts (60-75cm) to reduce fall impact.
- Sails: Smaller than your usual size, as foils require less power to get flying. Around 4.0 to 5.5 m² is typical for most learners.
Brands like Slingshot, Starboard, and Fanatic offer excellent beginner packages. Renting gear initially or taking lessons with provided equipment is a smart way to test what suits you before buying.
Read more about “Can You Learn to Hydrofoil Windsurf Without Experience? 🏄♂️ (2025)”
What are the key differences between traditional windsurfing and hydrofoil windsurfing that I should be aware of?
Traditional windsurfing relies on planing over the water’s surface, with the board’s hull in constant contact with the water, creating drag and requiring stronger winds. Hydrofoil windsurfing lifts the board above the water, drastically reducing drag and allowing you to sail in lighter winds with smoother, quieter rides. The stance and balance differ significantly: hydrofoiling demands subtle weight shifts and a more dynamic, athletic posture. The learning curve is steeper, but the reward is a unique sensation of flying over water.
Are there any specific safety precautions or techniques that I should learn in hydrofoil windsurfing lessons to avoid injury?
Absolutely. Safety is paramount. Key precautions include:
- Wearing a helmet and impact vest at all times.
- Learning how to fall safely — always away from the foil and rig to avoid cuts or blunt trauma.
- Ensuring the water depth is sufficient for your mast length.
- Checking all foil connections before each session to prevent mechanical failures.
- Using radio helmets during lessons for instant instructor feedback, which helps avoid dangerous mistakes early on.
Lessons will also teach you how to manage your speed and height to prevent uncontrolled crashes.
How long does it typically take to become proficient in hydrofoil windsurfing?
Progression varies widely depending on your prior windsurfing skills, physical fitness, and practice frequency. With dedicated private lessons and consistent practice, many riders achieve controlled flights within 3-6 hours of instruction. Mastering advanced maneuvers like foil jibes or tacks can take weeks or months. Patience and persistence are key — every session builds your confidence and skill.
Read more about “Is It Hard to Hydrofoil? 10 Essential Insights to Elevate Your Ride! 🌊”
Can I use my existing windsurfing gear to start hydrofoiling?
Partially. Your existing sails, harness, and rig are usually fine, though smaller sails are recommended. However, your board must be foil-ready with a reinforced fin box, and you’ll need a hydrofoil assembly compatible with your board. Attaching a foil to a standard fin box is unsafe and can cause damage. Consider renting foil-specific gear or investing in a dedicated foil board for the best experience.
Read more about “10 Best Hydro Foiling Boards to Fly Above Water in 2025 🚀”
📚 Reference Links: Dive Deeper into Windfoil Knowledge
- Garganosurf Hydrofoil Windsurfing Courses — Detailed course structure and pricing from a leading school.
- Foil Academy — Free, expert-led online lessons covering all foil disciplines.
- Starboard Windsurf Foils — Official product info and tech specs.
- Slingshot Sports Windsurf Foils — Innovative gear and packages.
- Fanatic Windsurf Foils — Complete foil setups and accessories.
- Naish Windsurf Foils — High-performance foiling gear.
- Hydrofoiling.org Hydrofoil Windsurfing Category — Our expert articles and guides.
- MACkite Boardsports Center – Windsurf Hydrofoil Boards — Additional resources and gear info.
Fly safe, fly smart, and welcome to the next level of windsurfing! 🌬️🛫