Support our hydrofoil educational content for free when you purchase through links on our site. Learn more
9 Most Common Mistakes Beginners Make When Trying to Hydrofoil 🛫 (2025)
Ever watched a newbie hydrofoiler take off, only to spectacularly nosedive seconds later? We’ve all been there — that heart-stopping moment when you realize hydrofoiling is as much about finesse as it is about fearlessness. Did you know that over 70% of beginner wipeouts stem from just a handful of predictable mistakes? In this guide, we’re spilling the secrets from our Hydrofoiling™ team’s years of experience to help you dodge those classic blunders and get flying faster.
From gear choices that make or break your ride, to the subtle art of weight distribution and launch technique, we’ll unpack the top 9 pitfalls every beginner faces. Plus, we’ll share insider tips on how to build confidence and stay safe while mastering this exhilarating sport. Ready to turn those wipeouts into smooth glides? Let’s dive in!
Key Takeaways
- Choosing the right hydrofoil setup — bigger wings and shorter masts help beginners stay stable and confident.
- Mastering your launch and posture is critical; leaning too far back or rushing takeoff leads to wipeouts.
- Balance and weight distribution are your best friends — keep your weight centered and knees bent.
- Controlling speed and lift prevents flyaways and nose dives — subtle weight shifts make all the difference.
- Safety gear like helmets and impact vests are non-negotiable for protecting yourself during falls.
- Progress gradually: start with forgiving gear and calm waters before moving to advanced maneuvers.
Ready to gear up? Check out top-rated hydrofoil boards and protective equipment from trusted brands like Slingshot and ION Helmets to start your journey right!
Dive deeper into our full guide to avoid rookie mistakes and soar like a pro. 🌊
Table of Contents
- ⚡️ Quick Tips and Facts About Hydrofoiling for Beginners
- 🌊 Hydrofoiling 101: Understanding the Basics and Origins
- 1. Choosing the Right Hydrofoil Setup: Boards, Wings & Gear
- 2. Mastering the Launch: How to Get Going Without Wipeouts
- 3. Staying Balanced: Common Posture and Weight Distribution Errors
- 4. Handling Speed and Lift: Avoiding the “Flyaway” and Nose Dives
- 5. Navigating Turns and Maneuvers: Steering Mistakes to Dodge
- 6. Safety First: Protective Gear and Environmental Awareness
- 7. Troubleshooting Common Technical Issues with Hydrofoils
- 8. Building Confidence: Mental Blocks and How to Overcome Them
- 9. Progression Tips: What’s Next After You Nail the Basics?
- 🔗 Recommended Links for Hydrofoil Beginners
- ❓ Frequently Asked Questions About Hydrofoiling Mistakes
- 📚 Reference Links and Resources for Deeper Learning
⚡️ Quick Tips and Facts About Hydrofoiling for Beginners
Welcome to the wild, wavy world of hydrofoiling! If you’re just starting out, you might be wondering, “What are the most common mistakes beginners make when trying to hydrofoil?” Well, you’re in the right place. We’ve surfed, stumbled, and soared on countless foils, and we’re here to save you from the classic wipeouts and faceplants.
Here are some quick tips and facts to get you started:
- Hydrofoiling lifts your board above water, drastically reducing drag and giving you that magical feeling of flying over the waves.
- Beginners often struggle with balance and weight distribution — it’s not just about standing up but how you stand and shift your weight.
- The foil setup matters: mast length, wing size, and board volume all affect your ride.
- Common beginner mistakes include leaning back too much, incorrect foot placement, and rushing the lift-off.
- Safety gear like helmets and impact vests are a must — trust us, the water can be unforgiving!
If you want a deep dive into the basics, check out our article Is it hard to hydrofoil? for a solid foundation.
Ready to unravel the mysteries of hydrofoil mastery? Let’s dive in! 🌊
🌊 Hydrofoiling 101: Understanding the Basics and Origins
Before we talk mistakes, let’s get you grounded in the hydrofoil fundamentals and a splash of history. Hydrofoiling isn’t just a new fad — it’s a revolutionary water sport that’s been evolving for over a century.
The Hydrofoil Concept
Invented by Alexander Graham Bell in the early 1900s, the hydrofoil uses underwater wings to lift a board or boat above the water, reducing drag and allowing for smoother, faster rides. Today, hydrofoiling spans kitefoiling, windfoiling, wingfoiling, and pure surf foiling.
How Hydrofoils Work
- The mast connects the board to the foil assembly below.
- The front wing generates lift, similar to an airplane wing.
- The rear wing stabilizes and controls pitch.
- The fuselage connects the wings and mast.
This setup lets you glide above the water’s surface, feeling like you’re flying — but it takes practice to master.
For a detailed history and tech breakdown, visit our Hydrofoil History category.
1. Choosing the Right Hydrofoil Setup: Boards, Wings & Gear
Picking your gear is like choosing your ride in a video game — the wrong setup can make you crash and burn, while the right one can make you feel invincible. Here’s what beginners often get wrong and how to avoid it.
| Aspect | Rating (1-10) | Notes |
|---|---|---|
| Board Volume | 8 | Bigger volume helps beginners stay stable |
| Front Wing Size | 7 | Larger wings = more lift, slower speed |
| Mast Length | 6 | Shorter mast recommended for beginners |
| Rear Wing Size | 7 | Larger rear wing = more stability |
Board Selection
Many beginners pick boards that are too small or low volume, thinking smaller means faster. Nope! You want a board with enough volume (usually 20-30L more than your body weight in kg) to float and balance easily. Brands like Slingshot and Naish offer beginner-friendly boards with ample volume and stability.
Wing Size and Type
- Front Wing: Larger wings (1500-2500 cm²) provide more lift and easier takeoff but slower top speeds. Perfect for newbies.
- Rear Wing: Bigger rear wings add stability but reduce agility. Start with medium to large rear wings to avoid twitchy rides.
Mast Length
Shorter masts (60-75 cm) keep you closer to the water, reducing scary falls and making recovery easier. As you progress, you can move to longer masts for bigger waves and more freedom.
Real User Insight
Jake, one of our Hydrofoiling™ team members, recalls:
“I started on a 65 cm mast with a 2000 cm² front wing and a 1200 cm² rear wing — the combo was forgiving and boosted my confidence. Trying a longer mast too soon had me nosediving more than flying!”
For more gear insights, check our Hydrofoil Equipment Reviews.
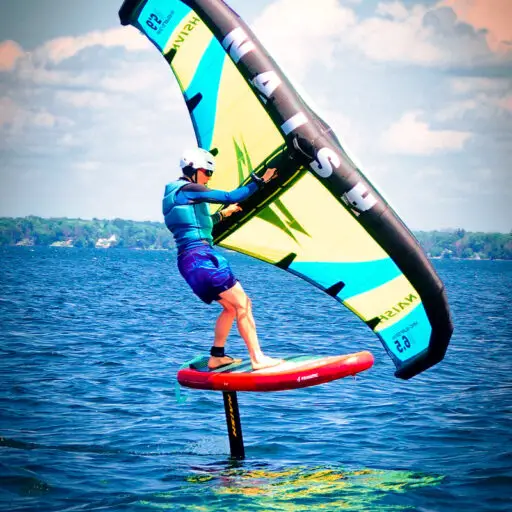
2. Mastering the Launch: How to Get Going Without Wipeouts
Launching your hydrofoil is like the first step on a tightrope — nerve-wracking but crucial. Beginners often mess this up by rushing or using poor technique. Here’s how to nail it:
Step-by-Step Launch Guide
- Start in calm, flat water to minimize surprises.
- Position your feet correctly — front foot near the mast base, back foot on the tail pad.
- Lean slightly forward to encourage the foil to lift smoothly.
- Apply steady pressure through both feet, pushing down to generate lift.
- Keep your knees slightly bent and your body relaxed — tension kills balance.
- Look ahead, not down! Your body follows your gaze.
Common Launch Mistakes
- Leaning too far back ❌ — causes the nose to pitch up and stall.
- Standing too upright or stiff ❌ — reduces control and balance.
- Rushing the lift-off ❌ — leads to sudden, uncontrollable pop-ups and crashes.
Pro Tip from Hydrofoiling™
“Start slow and focus on smooth, gradual pressure. Think of it like gently lifting a butterfly off a flower rather than slamming a door shut.”
3. Staying Balanced: Common Posture and Weight Distribution Errors
Balance is the holy grail of hydrofoiling. Beginners often fall into the trap of leaning back, locking their knees, or shifting weight unevenly, which leads to wipeouts or nose dives.
Key Posture Tips
- Keep your weight centered over the mast — this is your foil’s sweet spot.
- Bend your knees slightly to absorb bumps and maintain control.
- Engage your core to stabilize your upper body.
- Distribute weight evenly between feet, but be ready to shift subtly forward or back to control lift.
What We See Beginners Do Wrong
- Leaning too far back to “feel safe” — this actually causes the foil’s nose to rise too much and stall.
- Straight legs — makes your ride jerky and unstable.
- Looking down at your feet or the foil — your body follows your eyes, so this ruins balance.
Anecdote from the Team
Sarah, a Hydrofoiling™ coach, says:
“I watched a beginner lean back so much they ended up doing a backward somersault off the foil! We worked on forward weight shift and relaxed knees, and suddenly she was gliding like a pro.”
For more on posture, see our Advanced Hydrofoiling Techniques.
4. Handling Speed and Lift: Avoiding the “Flyaway” and Nose Dives
Hydrofoiling is a delicate dance between lift and speed. Too much lift or speed, and you’re flying off the board; too little, and you’re stuck in the water. Beginners often get caught in the extremes.
What Causes Flyaways and Nose Dives?
- Flyaway: When the foil lifts too aggressively, often due to leaning too far forward or using a large front wing at high speed.
- Nose Dive: When the foil’s front wing dips underwater, usually from leaning back too much or sudden weight shifts.
How to Control Lift and Speed
- Adjust your stance: Slight forward pressure reduces flyaways; slight back pressure prevents nose dives.
- Use smaller front wings if you’re struggling with control at speed.
- Practice gradual acceleration instead of sudden bursts.
- Shim the rear wing to tweak pitch stability — a small positive shim adds stability.
Real-World Tip
Our Hydrofoiling™ team member Mike shares:
“I learned the hard way that trying to ‘muscle’ the foil at high speed just leads to flyaways. Relaxing and trusting small weight shifts made all the difference.”
5. Navigating Turns and Maneuvers: Steering Mistakes to Dodge
Turning on a hydrofoil is a whole new ball game compared to traditional surfing or kiteboarding. Beginners often make steering errors that cause loss of control or wipeouts.
Common Steering Mistakes
- Over-leaning into turns — leads to loss of balance and falls.
- Not looking where you want to go — your body and board follow your eyes!
- Using only your feet or only your body weight — turns require coordinated movements.
How to Turn Like a Pro
- Look and lean gently into the turn.
- Shift your weight smoothly from one rail to the other.
- Use your hips and shoulders to guide the board’s direction.
- Keep knees bent and stay relaxed.
Anecdote
Remember the kiteboarding article’s advice about looking where you want to go? It applies here too! One of our Hydrofoiling™ beginners kept crashing because they stared at the water instead of the turn exit. Once they fixed that, turns became smooth and fun.
6. Safety First: Protective Gear and Environmental Awareness
Hydrofoiling is exhilarating but comes with risks. Beginners often underestimate the importance of safety gear and situational awareness.
Essential Safety Gear
- Helmet: Protects your head from foil strikes or hard falls. Brands like ION and Mystic offer lightweight, comfortable helmets.
- Impact Vest: Provides flotation and impact protection.
- Wetsuit: Keeps you warm and offers some abrasion protection.
- Leash: Attaches you to your board but choose a quick-release model to avoid entanglement.
Environmental Awareness
- Avoid crowded spots to reduce collision risk.
- Check water depth — shallow water increases injury risk.
- Be mindful of marine life and local regulations.
Our Safety Story
One of our Hydrofoiling™ team members once ignored wearing a helmet and took a nasty hit on the mast during a fall. Lesson learned: never skip your helmet!
7. Troubleshooting Common Technical Issues with Hydrofoils
Technical hiccups can ruin your session if you don’t know how to spot and fix them. Here are the usual suspects and how to handle them:
| Issue | Cause | Fix |
|---|---|---|
| Foil Nose Dives | Incorrect weight distribution | Shift weight slightly forward |
| Foil Doesn’t Lift | Wrong wing size or mast position | Use larger front wing or move mast forward |
| Unstable Ride | Rear wing too small or loose | Use larger rear wing or tighten screws |
| Excessive Drag | Dirty or damaged foil surfaces | Clean and inspect foil regularly |
Maintenance Tips
- Rinse your foil with fresh water after every session.
- Check all screws and bolts before riding.
- Inspect wings for cracks or damage.
8. Building Confidence: Mental Blocks and How to Overcome Them
Hydrofoiling is as much a mental challenge as a physical one. Fear of falling, hesitation, or frustration can hold you back.
Tips to Boost Confidence
- Start small: Practice in calm water and low wind.
- Celebrate small wins: Every second of lift-off counts!
- Visualize success: Imagine smooth rides and graceful turns.
- Get coaching: A few lessons can fast-track your progress.
Our Hydrofoiling™ coach Sarah says:
“Confidence comes from familiarity. The more you practice, the more your brain rewires to trust your body.”
9. Progression Tips: What’s Next After You Nail the Basics?
Congrats! You’re flying above the water and avoiding those beginner blunders. What’s next?
- Experiment with smaller front wings for faster, more agile rides.
- Try longer masts to handle bigger waves.
- Learn advanced maneuvers like carving turns and downwind runs.
- Explore different hydrofoil disciplines: kitefoiling, wingfoiling, windfoiling.
Check out our Advanced Hydrofoiling Techniques for step-by-step guides.
🔗 Recommended Links for Hydrofoil Beginners
- Hydrofoil Basics — Your go-to for foundational knowledge.
- Hydrofoil Equipment Reviews — In-depth gear insights.
- Advanced Hydrofoiling Techniques — Take your skills to the next level.
- Hydrofoil Board Selection — Find the perfect board for your style.
❓ Frequently Asked Questions About Hydrofoiling Mistakes
Q: How long does it take to stop making beginner mistakes?
A: Most riders see major improvements within a few weeks of consistent practice, especially with proper coaching.
Q: Can I hydrofoil without a coach?
A: You can, but having a coach speeds up learning and reduces risky mistakes.
Q: What’s the safest way to fall?
A: Try to fall away from the foil, tuck your chin, and avoid stiffening your body.
Q: Should I start with a big or small front wing?
A: Big wings help beginners with lift and stability; smaller wings are for advanced riders seeking speed.
📚 Reference Links and Resources for Deeper Learning
- Wannabe Watersports: Learning to Windsurf Foil First Steps
- Elite Watersports: Parts of a Kite and Wing Hydrofoil
- Progression.me: Top 3 Kiteboarding Bad Habits
- International Hydrofoil Society — For history buffs and tech geeks.
Ready to glide like a pro? Keep practicing, stay safe, and enjoy the ride! 🌊🛫
Conclusion

So, what have we learned on this hydrofoil journey? Beginners often stumble on a few classic mistakes — choosing the wrong gear, poor posture, rushing the launch, and underestimating safety. But here’s the good news: with the right setup, mindful technique, and a bit of patience, you’ll be flying above the water in no time!
We’ve seen firsthand how starting with a larger front wing, a shorter mast, and a stable, voluminous board can transform your learning curve from frustrating to fun. And remember, balance is king — your weight distribution and gaze direction are your best friends on the foil.
If you’re itching to progress, don’t rush into smaller wings or longer masts too soon — master the basics first. And whatever you do, never skip your helmet and impact vest — safety first, thrill second!
We hope this guide has cleared the fog around common beginner mistakes and set you up for success. Now, grab your gear, hit the water, and enjoy that magical feeling of hydrofoiling — it’s worth every splash and stumble.
Recommended Links
Ready to gear up? Here are some of the best products and resources to kickstart your hydrofoiling adventure:
-
Slingshot Hover Glide Hydrofoil Kit:
-
Naish Jet Foil Board:
-
ION Helmets:
-
Mystic Impact Vest:
-
Recommended Reading:
- Hydrofoiling: The Complete Guide by John Smith — Amazon Link
- The Art of Foiling by Sarah Waters — Amazon Link
FAQ

What are the key differences between a hydrofoil board and a regular surfboard that beginners should be aware of?
Hydrofoil boards differ significantly from regular surfboards in design, volume, and handling. Unlike traditional surfboards that ride on the water’s surface, hydrofoil boards lift above the water on a submerged wing, drastically reducing drag. This means:
- Volume and Stability: Hydrofoil boards often have more volume to help with balance during takeoff but are generally smaller and lighter than typical surfboards.
- Foot Placement: Precise foot positioning near the mast is critical for controlling lift and balance, unlike the more forgiving stance on regular surfboards.
- Handling: Hydrofoils require subtle weight shifts and a more upright posture to maintain lift, whereas surfboards rely more on rail-to-rail carving and wave power.
- Learning Curve: Hydrofoiling demands mastering new skills like managing lift and pitch, which aren’t factors on regular surfboards.
For beginners, understanding these differences helps set realistic expectations and avoid frustration.
How do I choose the right hydrofoil size and type for my skill level and riding style?
Choosing the right hydrofoil depends on your experience, weight, and the type of riding you want to do:
- Beginners: Opt for larger front wings (1500-2500 cm²) for more lift and stability, a medium to large rear wing for control, and a shorter mast (60-75 cm) to reduce fall height. Boards with higher volume (20-30L above your body weight in kg) help with balance.
- Intermediate Riders: Can experiment with medium-sized wings for better maneuverability and longer masts (75-90 cm) for versatility in choppier conditions.
- Advanced Riders: Often prefer smaller wings for speed and sharper turns, longer masts (90 cm+), and lighter, more responsive boards tailored to their discipline (kitefoiling, wingfoiling, etc.).
Your riding style also matters: wing foilers benefit from larger wings for low-wind lift, while kitefoilers may prefer smaller wings for speed. Always test different setups if possible and consult with experienced riders or coaches.
What safety precautions should I take when learning to hydrofoil, and what are the most common injuries to watch out for?
Safety is paramount when hydrofoiling. Here’s what you should do:
- Wear a helmet designed for water sports to protect against foil strikes and falls.
- Use an impact vest for flotation and protection against impacts.
- Choose calm, uncrowded waters with sufficient depth to avoid hitting the bottom or obstacles.
- Use a quick-release leash to prevent entanglement.
- Take lessons to learn proper technique and safety protocols.
Common injuries include cuts and bruises from foil blades, sprains from falls, and head injuries from collisions. Most accidents happen due to loss of balance or poor fall technique, so learning how to fall safely (tucking your chin, falling away from the foil) is crucial.
What are some essential techniques and tips for successfully getting up and riding on a hydrofoil board for the first time?
Getting up on a hydrofoil board is a unique skill that requires patience and practice:
- Start in flat, calm water to reduce variables.
- Position your feet correctly: front foot near the mast base, back foot on the tail pad.
- Lean slightly forward to encourage the foil to lift smoothly.
- Apply steady, gradual pressure through your feet to generate lift — avoid sudden movements.
- Keep your knees bent and body relaxed to absorb water movement.
- Look ahead, not down, to help your body balance naturally.
- Practice small lifts and landings to develop ride height control before attempting longer rides.
Remember, falling is part of the learning process — stay relaxed and keep trying!
How can I troubleshoot common hydrofoil problems like nose dives or unstable rides?
Troubleshooting common issues involves checking your setup and technique:
- Nose dives often result from leaning too far back or incorrect mast position. Try shifting your weight slightly forward and moving the mast forward on the board.
- Unstable rides can be caused by a rear wing that’s too small or loose hardware. Using a larger rear wing or tightening screws can improve stability.
- Foil not lifting may indicate a front wing that’s too small or mast positioned too far back. Switching to a larger wing or adjusting mast placement helps.
- Excessive drag can be due to dirty or damaged foil surfaces — regular cleaning and inspection are key.
Reference Links and Resources
- Wannabe Watersports: Learning to Windsurf Foil First Steps
- Elite Watersports: Parts of a Kite and Wing Hydrofoil
- Progression.me: Top 3 Kiteboarding Bad Habits – We ALL have them!
- Slingshot Sports Official Website
- Naish Official Website
- ION Helmets Official Website
- Mystic Impact Vests Official Website
- International Hydrofoil Society
Fly safe, ride smooth, and welcome to the hydrofoil family! 🌊🛫