Support our hydrofoil educational content for free when you purchase through links on our site. Learn more
How to Maintain & Repair Your Hydrofoil Board: 10 Pro Tips (2025) 🛠️
You’ve invested in a hydrofoil board—a sleek, high-tech marvel that lets you glide above the waves like a waterborne superhero. But here’s the catch: without proper care, that magic can fade fast. Did you know that neglecting simple maintenance can slash your board’s lifespan by half? We’ve seen it happen time and again at Hydrofoiling™ HQ.
In this guide, we’ll share 10 expert tips to keep your hydrofoil board in peak condition, from quick post-ride rinses to tackling stubborn corrosion and even caring for your eFoil’s battery. Plus, we’ll reveal the one mistake that nearly cost one of our riders his front wing mid-wave (spoiler: it’s all about those screws). Ready to keep flying high season after season? Let’s dive in!
Key Takeaways
- Rinse with fresh water after every session to prevent salt corrosion and buildup.
- Regularly inspect and tighten all screws—loose hardware is the #1 cause of accidents.
- Use anti-seize lubricant and Teflon tape on screws to prevent galvanic corrosion.
- Repair minor dings quickly with UV-cure resin; bigger structural damage needs professional help.
- For eFoils, battery care is critical: store at 30-50% charge in a cool, dry place and avoid extreme temps.
- Store your board in a padded bag, away from direct sunlight and heat to protect materials.
- Develop a routine maintenance habit: pre-ride checks, post-ride rinses, and monthly deep cleanings.
👉 Shop Maintenance Essentials:
Table of Contents
- ⚡️ Quick Tips and Facts for Hydrofoil Board Maintenance
- 🌊 The Evolution of Hydrofoil Boards: From Concept to Care
- 🔧 1. Essential Tools and Materials for Hydrofoil Board Repair
- 🛠️ 2. Step-by-Step Guide to Inspecting Your Hydrofoil Board
- 💥 3. Common Hydrofoil Board Damages and How to Fix Them
- 🧴 4. How to Properly Clean and Maintain Your Hydrofoil Board
- 🔩 5. Tightening and Replacing Hydrofoil Components: Screws, Fins, and More
- ⚡️ 6. Battery and Electronics Care for Electric Hydrofoil Boards (Efoils)
- 🌞 7. Storage Solutions: Protecting Your Hydrofoil Board Off-Season
- 🛡️ 8. Preventative Measures to Extend the Lifespan of Your Hydrofoil Board
- 🧰 9. When to DIY and When to Seek Professional Hydrofoil Repairs
- 🔍 10. Troubleshooting Performance Issues: Smooth Sailing Ahead
- 📚 Conclusion: Keeping Your Hydrofoil Board Flying High
- 🔗 Recommended Links for Hydrofoil Board Care and Repair
- ❓ FAQ: Your Hydrofoil Board Maintenance Questions Answered
- 📖 Reference Links and Resources
Aloha, fellow riders of the glide! 🤙
Welcome to the Hydrofoiling™ garage. We’re the team that lives and breathes everything foil. We’ve seen it all: the glorious flights, the epic wipeouts, and yes, the heartbreaking moment you spot that first ding. You’ve invested in a piece of magical equipment—part surfboard, part airplane—and you want that magic to last. The big question we always get is, “How do I keep my hydrofoil board from falling apart?”
Well, you’ve come to the right place. We’re about to spill all our secrets on maintaining and repairing your hydrofoil to ensure it lives a long, glorious life of flying above the water. Forget guesswork; this is your ultimate guide, forged from countless hours on the water and in the workshop. Let’s dive in!
⚡️ Quick Tips and Facts for Hydrofoil Board Maintenance
Pressed for time? Here’s the lowdown. Think of this as your pre-flight checklist to keep your gear in top shape. If you’re in the market for new gear, be sure to check out our guide on finding the perfect hydrofoil for sale.
| Do’s and Don’ts of Hydrofoil Care | ✅ DO | ❌ DON’T |
|---|---|---|
| After Every Session | Rinse your entire setup—board, foil, and all hardware—with fresh water. | Leave saltwater to dry on your gear. It’s a recipe for corrosion! |
| Hardware Care | Regularly apply anti-seize lubricant (like Tef-Gel) to all screw threads. | Overtighten your screws. This can damage the threads or your board’s fin box. |
| Board & Wing Care | Inspect for dings, scratches, or cracks before and after each ride. | Leave your board baking in direct sunlight or a hot car. |
| Storage | Store your board in a cool, dry place, preferably in a padded board bag. | Store your foil fully assembled for long periods. |
| eFoil Battery | Store batteries at a 30-50% charge in a cool, dry place for longevity. | Charge your battery unattended or in the main living areas of your home. |
🌊 The Evolution of Hydrofoil Boards: From Concept to Care
Ever wonder how we got here, gliding silently over the water on these futuristic wings? The concept of hydrofoils has been around for over a century, but their application to board sports is a relatively recent explosion of innovation. You can dive deeper into the fascinating journey in our Hydrofoil History section.
Early foils were clunky, heavy, and often homemade contraptions. Maintenance was an afterthought. Today, we’re riding finely tuned instruments made from advanced materials like carbon fiber, aircraft-grade aluminum, and stainless steel. This evolution means that while our gear is higher performing, it also requires more specific care.
The biggest game-changer? The mix of different metals. Most foils use an aluminum mast and fuselage with stainless steel or titanium screws. When you introduce saltwater (an electrolyte), you create a perfect storm for galvanic corrosion—an electrochemical process where one metal corrodes in preference to another. This is the arch-nemesis of your hydrofoil. It’s why your screws can get “stuck” or “seized,” sometimes to the point where you can’t get your foil apart.
Understanding this basic science is the first step to becoming a maintenance master. It’s not just about cleaning; it’s about preventing a chemical reaction that wants to eat your expensive toy for lunch!
🔧 1. Essential Tools and Materials for Hydrofoil Board Repair
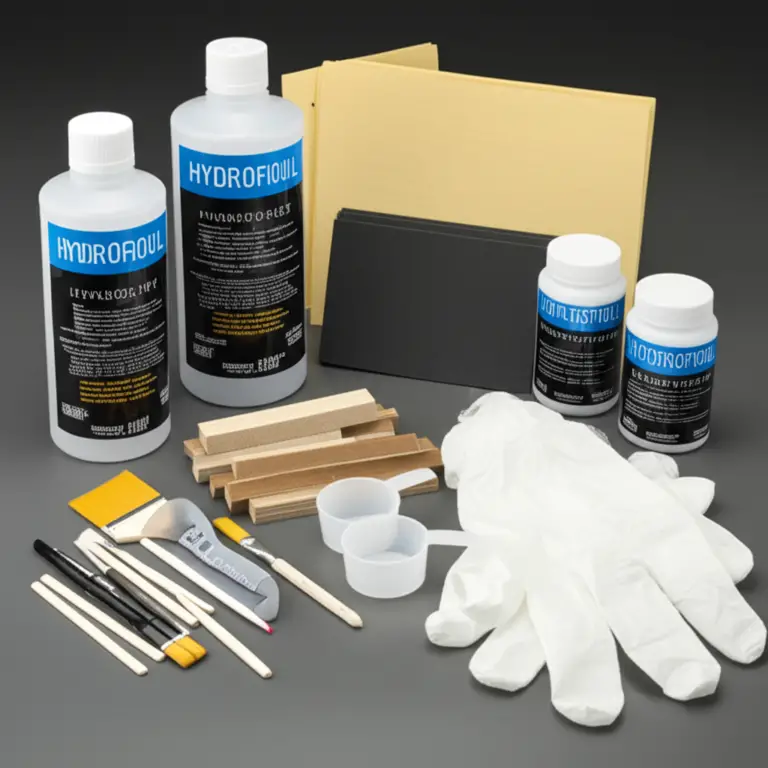
You don’t need a full-blown shaping bay, but having a dedicated “foil first-aid kit” will make your life infinitely easier. Here at the Hydrofoiling™ HQ, we’ve got a go-box with everything we need for quick fixes and regular upkeep.
| Tool/Material | Purpose | Our Pro Tip |
|---|---|---|
| Fresh Water Source | Rinsing salt and debris off all components. | A portable pressure washer or even a simple garden sprayer works wonders at the beach. |
| Correct Screw Drivers | Tightening/loosening foil hardware (usually Torx or Hex). | Use the exact tool your manufacturer provided. Using the wrong one is the #1 way to strip a screw head. |
| Anti-Seize Lubricant | Preventing galvanic corrosion and seized screws. | Tef-Gel and Permatex Anti-Seize are our top picks. A little goes a long way! |
| Teflon Tape | An extra barrier against corrosion and helps prevent screws from vibrating loose. | Wrap it clockwise on the screw threads so it doesn’t unravel when you tighten it. |
| UV-Cure Resin (e.g., Solarez) | Quick-fix for small dings and scratches on the board or wings. | Work in the shade! This stuff cures fast in sunlight, so apply it, shape it, and then expose it to UV. |
| Wet/Dry Sandpaper | Smoothing out resin repairs (various grits from 120 to 1000). | Always use water when wet sanding for a much smoother, professional-looking finish. |
| Microfiber Cloths | Cleaning and drying your gear without scratching it. | Have a few dedicated ones for your foil kit. |
| Epoxy Repair Kit | For more significant, structural repairs to carbon or fiberglass. | For bigger jobs, consider a dedicated carbon fiber repair kit. |
👉 Shop Repair Essentials on:
- Anti-Seize Lubricant: Amazon | Walmart
- UV-Cure Resin: Amazon | Etsy
- Carbon Fiber Repair Kits: Amazon | Etsy
🛠️ 2. Step-by-Step Guide to Inspecting Your Hydrofoil Board
Think of yourself as a pilot doing a pre-flight check. A thorough inspection takes five minutes and can save you from a long swim back to shore or a costly repair down the line.
H3: The Pre-Ride Checkup
- Board Examination: Run your hands over the deck and bottom of the board. Feel for any new dings, soft spots, or delamination. Pay close attention to the area around the foil box, looking for stress cracks.
- Foil Box Integrity: Give the mast a gentle wiggle side-to-side. There should be zero play. If it moves, your foil box tracks might be damaged, or your screws are loose.
- Hardware Check: This is non-negotiable. Check every single screw that holds your foil together—mast to board, mast to fuselage, wings to fuselage. Ensure they are snug. Not “crank-it-with-all-your-might” tight, but securely fastened.
- Wing Inspection: Examine the leading and trailing edges of your front and stabilizer wings. Even small nicks can affect performance. Look for any cracks, especially where the wings meet the fuselage.
- eFoil Power-On Test (Out of Water): For our eFoil friends, power on the board and controller before you hit the water. Ensure they pair correctly and give the throttle a quick blip (max 1-2 seconds) to confirm the motor spins. Never run the motor out of the water for more than a few seconds, as it can damage the seals.
H3: The Post-Ride Breakdown
- The Freshwater Rinse: As soon as you’re off the water, give everything a thorough rinse. As Swellwake notes in their guide for the Flite eFoil, you should “Rinse your Flite eFoil with fresh water after every use.” This is the golden rule for all hydrofoils. Loosen the screws a few turns to let water flush out the threads and joints.
- Disassembly & Deeper Look: While you don’t have to fully disassemble after every single session (especially in freshwater), it’s a crucial habit if you ride in salt. When you take it apart, look for any white, chalky residue—that’s the start of corrosion. Clean it off immediately.
- Dry and Store: Wipe everything down with a microfiber cloth or let it air dry completely before putting it in a bag. Trapping moisture is a big no-no.
💥 3. Common Hydrofoil Board Damages and How to Fix Them
Accidents happen. Whether you hit a sandbar or dropped your board in the parking lot, damage is almost inevitable. The key is knowing how to handle it.
H3: Scratches, Dings, and Gouges 🤕
These are the most common battle scars.
-
Light Scratches: Often just cosmetic. If they’re shallow, you can wet-sand them with high-grit sandpaper (1000-1800 grit) to smooth them out. Be gentle, especially on carbon wings. If you see black dust, you’re sanding the carbon, so stop!
-
Deeper Dings (Not through the carbon/fiberglass): If you can feel it with your fingernail, it needs filling. This is a perfect job for UV-cure resin like Solarez.
- Prep: Clean the area and lightly sand it with 120-grit paper to help the resin adhere.
- Fill: Working in the shade, apply the resin, slightly overfilling the ding.
- Form: You can place a clear piece of packing tape over the resin to create a smooth, level surface.
- Cure: Expose it to direct sunlight. It’ll harden in minutes!
- Finish: Peel off the tape and sand the repair flush with the rest of the surface, starting with a medium grit and moving to a fine, wet sand.
-
Gouges (Core is exposed): Houston, we have a problem. If you see foam, your board is no longer watertight. Do not take it back in the water! Waterlogged boards are heavy, perform poorly, and can lead to major structural failure. This requires a proper epoxy repair. While DIY is possible with an epoxy repair kit, we recommend checking our guide on when to see a pro later in this article.
H3: The Dreaded Corrosion and Seized Screws 🥶
This is where prevention is worth a metric ton of cure.
- What it is: Galvanic corrosion happens when dissimilar metals (aluminum mast, steel screws) meet in saltwater. It creates a white, crusty buildup that can literally weld your screws into place.
- Prevention:
✅ Grease is your best friend. Apply an anti-seize lubricant or marine grease to your bolts every few sessions, especially in saltwater.
✅ Teflon tape provides an excellent secondary barrier.
✅ Disassemble regularly. Don’t let your foil stay assembled for weeks on end. - The Fix: If a screw is stuck, don’t just force it. You risk stripping the head or breaking the screw.
- Apply a penetrating oil (like WD-40 Specialist Penetrant) and let it sit.
- Try gently heating the area around the screw with a hairdryer (not a blowtorch!) to expand the metal.
- Use the correct, high-quality tool and apply firm, steady pressure to try and break it loose.
- If it won’t budge, it’s time to visit a professional. They have tools and tricks that can save your gear without causing more damage.
🧴 4. How to Properly Clean and Maintain Your Hydrofoil Board
A clean foil is a happy foil. This simple ritual is the most effective thing you can do to extend its life.
H3: The Post-Session Rinse Down
We can’t say it enough: rinse with fresh water after every single use. Salt is incredibly corrosive.
- The Full Shower: Hose down the entire board and assembled foil.
- Focus on the Joints: Pay special attention to where the mast meets the board and where the wings and fuselage connect.
- Flush the Threads: Loosen each screw a few turns and spray water directly into the gaps to flush out any trapped salt or sand.
- eFoil Specifics: For eFoils like those from Lift Foils, you also need to flush the motor’s water-cooling system. Hold a hose to the water inlet to push fresh water through. For brands like Fliteboard, follow their specific cleaning procedures to ensure all components are properly cared for.
The fantastic video from Slingshot Sports, “How to Maintain your Hydrofoil,” embedded above, gives a great visual walkthrough of this process. Check it out at #featured-video!
H3: Deep Cleaning and Polishing
Every once in a while, give your gear a spa day.
- Removing Buildup: For stubborn salt buildup, you can use a soft brush and a mild, biodegradable soap.
- Polishing: Some riders like to use a non-stick spray or polish on their wings. A product like McLaren Shine and Go can help shed water and keep the surface slick. While the claim that it makes you faster is debatable, it definitely makes cleaning easier next time!
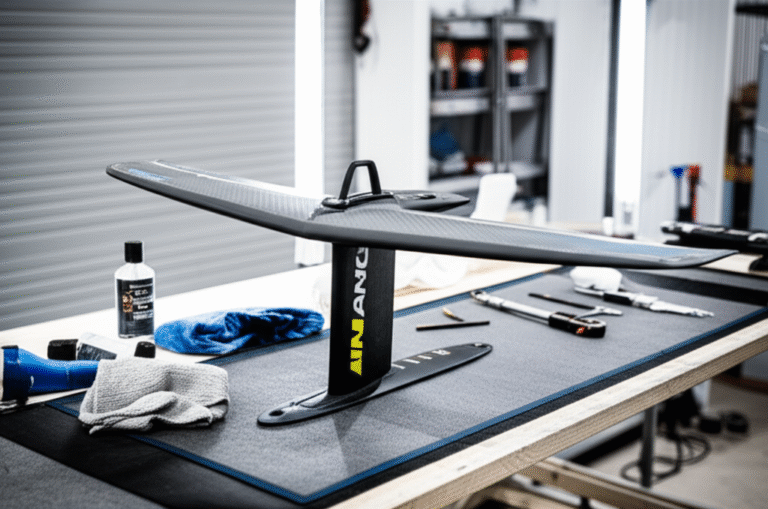
🔩 5. Tightening and Replacing Hydrofoil Components: Screws, Fins, and More
Your foil is a modular system, and its strength is in its connections. Keeping those connections solid is paramount for safety and performance.
H3: The Art of the Screw
- Check Before You Fly: We mentioned it in the inspection, but it bears repeating: check your screws before every session. Vibrations can cause them to loosen over time.
- Lubricate, Lubricate, Lubricate: Did we mention using anti-seize grease? Good. Use it. It prevents the aluminum and steel from reacting, which is the root cause of stuck screws.
- Torque Matters: Don’t go full Hulk on your screws. Overtightening can strip the threads in your aluminum mast or fuselage, or even crack your board’s foil box. The goal is “snug and secure.” Some brands, like Armstrong Foils, provide torque drivers for precise tightening.
- When to Replace: Screws are consumables. If a screw head starts to look worn, or if the threads are damaged, replace it immediately. A cheap screw is not worth the risk of a foil coming apart mid-flight.
H3: A Personal Anecdote: The Day My Foil Tried to Escape
One of our team riders, let’s call him “Dave,” learned this lesson the hard way. He was in a rush, skipped his pre-ride check, and went out in some pumping swell. Halfway through a bottom turn on a solid wave, he felt a weird wobble. By the time he kicked out, his front wing was hanging on by a single, very stressed screw. The other had vibrated loose and vanished into the deep. A five-second check would have saved him a long swim and the cost of a new screw set. Don’t be like Dave.
⚡️ 6. Battery and Electronics Care for Electric Hydrofoil Boards (Efoils)
For those of you riding the electric wave, your battery is the heart of your machine. It’s also the most expensive and potentially hazardous component, so proper care is critical.
The principles of lithium-ion battery care are similar across many devices. Insights from the maintenance of a Onewheel are highly relevant here. The article from Elite Watersports on Onewheel lifespan highlights key practices that directly apply to eFoils.
H3: Charging and Daily Use
- Cool Down First: After a ride, let your battery cool down for at least 30 minutes before charging. Charging a hot battery is bad for its long-term health.
- Charge Safely: Never charge a battery unattended, indoors in a living space, or in direct sunlight. Find a safe, cool, and dry spot like a garage or covered patio.
- The 80/20 Rule: To maximize battery lifespan, try to avoid regularly charging to 100% or draining to 0%. As the Onewheel guide suggests, the ideal range is keeping it between 20% and 90%. [Elite Watersports] If you’re not riding the next day, storing it at a partial charge is much better than leaving it full.
- Connection Points: Keep the data and power connection points on your battery and board clean and dry. After rinsing, dry them thoroughly and consider applying a dielectric grease or a product like ReelX to prevent corrosion on the electrical contacts.
H3: Long-Term Storage
If you’re putting your eFoil away for the winter, storage is key.
- Storage Charge Level: Do not store your battery fully charged or fully empty. The ideal storage state is between 30-50% charge. Both Lift Foils and Waydoo recommend this range.
- Temperature is Crucial: Store the battery in a cool, dry place. The ideal temperature range is between 41°F and 77°F (5°C to 25°C). Never store it in a hot car or an uninsulated shed in the summer. Extreme temperatures degrade battery performance and life.
- Check-In Every Few Months: Lithium-ion batteries slowly self-discharge over time. To prevent it from becoming over-discharged (which can permanently kill it), plan to check the charge and top it up to the 30-50% range every 2-3 months.
| eFoil Battery Care Summary | ✅ Best Practice | ❌ Common Mistake |
|---|---|---|
| Charging | Let it cool before charging; charge in a safe, ventilated area. | Leaving it on the charger for days; charging in direct sun. |
| Daily Use | Keep connectors clean and dry; apply anti-corrosion spray. | Dropping the battery or exposing it to hard impacts. |
| Storage | Store at 30-50% charge in a cool, dry place (41-77°F). | Storing it fully charged/empty or in extreme temperatures. |
| Long-Term | Check and top up the charge to ~50% every 2-3 months. | Forgetting about it all winter, allowing it to fully discharge. |
🌞 7. Storage Solutions: Protecting Your Hydrofoil Board Off-Season
How you store your gear can be just as important as how you use it. Proper storage protects against the silent killers: UV rays, extreme temperatures, and humidity.
H3: The Ideal Storage Environment
The perfect spot for your hydrofoil is a cool, dry, and dark place. A garage is often the go-to, but be mindful of temperature swings. If your garage gets scorching hot in the summer, it can weaken the epoxy and adhesives in your board over time.
- ✅ Good: A climate-controlled room, an insulated garage, or a well-ventilated storage space.
- ❌ Bad: An uninsulated metal shed, outdoors under a tarp, or in a car trunk.
H3: Racking and Bagging
- Get it Off the Ground: Don’t store your board directly on a concrete floor, which can trap moisture. Use a wall-mounted rack or at least place it on foam blocks.
- Invest in a Good Bag: A high-quality, padded board bag is one of the best investments you can make. It protects from:
- Dings and Scratches: During transport and storage.
- UV Damage: Sunlight will fade your board’s graphics and degrade the materials over time.
- Heat: A reflective bag can help mitigate some heat exposure.
- Foil Covers: Don’t forget about the sharp bits! Padded covers for your wings and mast are essential. They protect the foil from damage, and just as importantly, they protect you, your car, and everything else from the foil’s sharp edges.
👉 Shop Storage Solutions on:
🛡️ 8. Preventative Measures to Extend the Lifespan of Your Hydrofoil Board
The best repair is the one you never have to do. Building good habits is the secret to making your gear last for years. This is all about moving from a reactive mindset (“Oh no, it’s broken!”) to a proactive one.
H3: Develop a Routine
Consistency is everything. Make these steps a non-negotiable part of your foiling life:
- The 5-Minute Pre-Check: Before you even leave the house, give your gear a once-over. Check your screws. Look for damage. It’s the simplest way to catch a small problem before it becomes a big one.
- The 10-Minute Post-Rinse: Make the freshwater rinse an automatic ritual, like stretching after a workout. Don’t put it off. The longer salt sits, the more damage it does.
- The Monthly Deep Dive: Once a month, fully disassemble your foil. Clean every component, inspect every thread, and re-apply your anti-seize lubricant. This is your chance to spot corrosion or wear and tear before it becomes critical.
H3: On-the-Water Awareness
- Know Your Spot: Be aware of the water depth. Most wing and board damage happens from hitting the bottom in shallow water.
- Handle with Care: Be mindful on the beach. A gust of wind can easily flip your board and smash your foil on the rocks or pavement.
- Transport Safely: Use proper racks and bags when driving. Most dings happen out of the water!
🧰 9. When to DIY and When to Seek Professional Hydrofoil Repairs
We’re all for the DIY spirit, but it’s crucial to know your limits. A botched repair can be worse than the original damage, potentially compromising the structural integrity of your gear.
| Type of Damage | ✅ Go for it (DIY) | ❌ Call a Pro |
|---|---|---|
| Scratches & Scuffs | Wet sanding and polishing is a great DIY skill to learn. | If you’re not comfortable, a pro can make it look brand new. |
| Small Dings (watertight) | Perfect job for UV-cure resin. It’s fast, easy, and effective. | N/A |
| Dings with Exposed Foam | Possible with a 2-part epoxy kit if you’re experienced with board repair. | Recommended. A pro will ensure a strong, watertight, and color-matched repair. |
| Cracks in Wings or Mast | NEVER. A crack indicates a structural failure. | ALWAYS. This is a serious safety issue. A cracked mast or wing can fail under load, leading to a dangerous situation. |
| Stripped Screw Threads | N/A | ALWAYS. A pro can often install a helicoil insert to save the part, especially in an aluminum fuselage. |
| Major Delamination | N/A | ALWAYS. This requires advanced techniques to fix properly. |
| eFoil Electronics/Battery Issues | Basic troubleshooting (checking connections, firmware updates). | ALWAYS. Do not open the battery or motor housing. Contact the manufacturer or an authorized service center. |
Our advice: When in doubt, take it to a professional. Your local surf or foil shop can usually offer repairs or recommend a trusted expert. It’s a small price to pay for safety and peace of mind.
🔍 10. Troubleshooting Performance Issues: Smooth Sailing Ahead
Is your foil acting… weird? Sometimes, performance issues aren’t about your technique, but about your gear’s condition.
H3: Problem: My foil is making a humming or whistling noise.
- The Cause: This is almost always caused by the trailing edges of your wings or mast being too sharp or having a small imperfection. Water flowing over it at high speed creates a harmonic vibration.
- The Fix: This is an easy one! Take a piece of high-grit (600-1000) wet sandpaper and very lightly sand the trailing edge of the noisy component. The goal is to slightly dull the razor-sharp edge. As ENSIS Watersports suggests, you can sand it at a slight 30-degree angle. Just a few passes are usually enough to break up the vibration and silence the noise.
H3: Problem: My board feels wobbly or unstable.
- The Cause:
- Loose Screws: The most common culprit. A tiny bit of play in the system translates to a lot of instability under your feet.
- Damaged Foil Box: Stress cracks or damage where the mast connects to the board.
- Bent Components: A bent mast or fuselage from a hard impact.
- The Fix: First, check all your screws. If they are tight and you still have wobble, carefully inspect the foil box for any signs of damage. Lay the mast on a flat surface to check if it’s bent. If you suspect a bent part or a damaged box, it’s time to see a professional.
H3: Problem: My eFoil has reduced power or cuts out.
- The Cause:
- Dirty Connections: Corrosion or debris on the battery’s power or data connectors.
- Propeller Issue: Seaweed or fishing line wrapped around the propeller.
- Firmware: Out-of-date firmware on the board, battery, or controller.
- Battery Health: An aging battery may not be able to deliver peak power.
- The Fix:
- Safety First: Disconnect the battery before inspecting anything.
- Inspect & Clean: Check the propeller for obstructions. Clean all electrical connection points with contact cleaner and ensure they are dry.
- Update Firmware: Check the manufacturer’s app or website (Lift Foils App, Flite App) for any available updates.
- Monitor Battery: If the problem persists, monitor your battery’s performance. Note how long it lasts and if the power loss happens at a specific charge level. Contact customer support with this information if needed.
📚 Conclusion: Keeping Your Hydrofoil Board Flying High

Well, there you have it—your comprehensive roadmap to maintaining and repairing your hydrofoil board like a pro. From the moment you rinse off that salty spray to the careful inspection of every screw and wing, each step you take adds years to your board’s life and hours to your ride time.
Remember Dave’s story? That near-miss with a loose screw could have been avoided with a simple pre-ride check. It’s these small rituals—rinsing, inspecting, lubricating—that keep your gear safe and performing at its best. And if you’re riding an eFoil, don’t forget that your battery and electronics need just as much TLC as your wings and mast.
While DIY repairs like filling dings with UV resin or tightening screws are empowering and cost-effective, knowing when to call in the experts is crucial. Structural cracks, major delamination, or stubborn corrosion require professional attention to keep you safe and your gear reliable.
In short: Treat your hydrofoil board like the high-performance machine it is. With a little love and attention, your hydrofoil will keep you flying over waves for many seasons to come.
Ready to keep your gear in top shape? Dive into our Hydrofoil Equipment Reviews and Advanced Hydrofoiling Techniques for more tips and gear insights!
🔗 Recommended Links for Hydrofoil Board Care and Repair
Here’s your curated shopping list to keep your hydrofoil in tip-top shape:
-
Anti-Seize Lubricants & Marine Grease:
Amazon – Tef-Gel Anti-Seize | Walmart – Marine Anti-Seize | Permatex Official Website -
UV-Cure Resin Repair Kits:
Amazon – Solarez UV Resin | Etsy – UV Cure Surfboard Resin -
Carbon Fiber Repair Kits:
Amazon – Carbon Fiber Repair Kit | Etsy – Carbon Fiber Repair Kit -
Board Bags & Foil Covers:
Amazon – Hydrofoil Board Bag | Walmart – Foil Board Bag
Amazon – Hydrofoil Wing Covers | Etsy – Hydrofoil Covers -
Contact Cleaner & Dielectric Grease:
Amazon – Electrical Contact Cleaner | Amazon – Dielectric Grease -
Recommended Books:
“The Art of Foil Surfing” – A great read for understanding the nuances of hydrofoil riding and care.
“Composite Repair for Water Sports Equipment” – Detailed guide on repairing carbon and fiberglass boards.
❓ FAQ: Your Hydrofoil Board Maintenance Questions Answered

What are the best practices for cleaning and storing a hydrofoil board?
Cleaning: Always rinse your hydrofoil board and foil components with fresh water immediately after use, especially after saltwater sessions. This prevents salt buildup and corrosion. Use mild soap occasionally for stubborn dirt, but avoid harsh chemicals that can damage the epoxy or carbon fiber. Dry thoroughly with microfiber cloths.
Storing: Store your board in a cool, dry, shaded place away from direct sunlight and extreme temperatures. Use a padded board bag and foil covers to protect from dings and UV damage. Avoid leaving your foil fully assembled for long periods to prevent corrosion buildup in joints.
Read more about “12 Essential Hydrofoil Board Maintenance & Repair Tips You Need in 2025 🛠️”
How can I identify and fix common damage on my hydrofoil board?
Identification: Regularly inspect your board and foil for scratches, dings, cracks, or delamination. Run your hands over the surface, look for soft spots, and check hardware tightness. White chalky residue on screws or joints signals corrosion.
Fixes:
- Minor scratches: Wet sand with fine grit sandpaper.
- Small dings (no core exposure): Fill with UV-cure resin like Solarez.
- Exposed foam or cracks: Requires epoxy repair or professional service.
- Corroded or seized screws: Apply penetrating oil, heat gently, or seek professional help.
Read more about “Does Hydrofoil Help With Porpoising? 7 Must-Know Facts (2025) 🌊”
What tools and materials do I need for hydrofoil board maintenance and repair?
Essential Tools:
- Correct screwdrivers (Torx or Hex)
- Anti-seize lubricant (e.g., Tef-Gel)
- UV-cure resin and epoxy repair kits
- Wet/dry sandpaper (120 to 1000 grit)
- Microfiber cloths
- Penetrating oil (WD-40 Specialist)
- Contact cleaner and dielectric grease for eFoil electronics
Having these ready ensures you can perform routine maintenance and minor repairs confidently.
How often should I inspect and service my hydrofoil board components?
Inspection Frequency:
- Before and after every session: Quick visual and hardware check.
- Monthly: Full disassembly, cleaning, and lubrication of all foil components, especially if used in saltwater.
- Seasonally: Deep inspection for structural integrity, including the foil box and mast.
Regular servicing prevents small issues from becoming costly repairs and keeps you safe on the water.
How do I care for my eFoil battery to maximize its lifespan?
Store your lithium-ion battery at 30-50% charge in a cool, dry place between 41°F and 77°F (5°C to 25°C). Avoid fully charging or fully discharging regularly. Charge the battery only when cool and never leave it unattended during charging. Check and top up the charge every 2-3 months during long-term storage. Keep connectors clean and dry, applying dielectric grease to prevent corrosion.
Can I repair structural cracks or delamination myself?
Structural cracks or delamination are serious and compromise safety. These repairs require specialized knowledge and equipment. We strongly recommend seeking professional repair services to ensure your hydrofoil’s integrity and your safety.
📖 Reference Links and Resources
- Swellwake Flite eFoil Maintenance Tips
- Elite Watersports: What is the Life Expectancy of a Onewheel?
- Lift Foils Official Website
- Fliteboard Official Website
- Permatex Anti-Seize Lubricant
- Tef-Gel Anti-Seize
- WD-40 Specialist Penetrant
- Amazon – Carbon Fiber Repair Kits
- Hydrofoiling™ Hydrofoil Basics
- Hydrofoiling™ Hydrofoil Equipment Reviews
- Hydrofoiling™ Advanced Hydrofoiling Techniques
- Hydrofoiling™ Hydrofoil Board Selection
We hope this guide helps you keep your hydrofoil board soaring smoothly and safely for many seasons. Now go out there and fly! 🌊🛠️✨