Support our hydrofoil educational content for free when you purchase through links on our site. Learn more
7 Essential Techniques for Mastering Balance & Control While Hydrofoiling 🏄♂️ (2025)
Ever felt like you’re on the brink of flying over water — only to crash spectacularly moments later? We’ve all been there. Hydrofoiling is one of the most exhilarating water sports out there, but it demands a delicate dance of balance and control that can leave even seasoned surfers scratching their heads. Did you know that mastering just a handful of key techniques can transform your wobbling first flights into smooth, graceful glides? Stick with us, and by the end of this article, you’ll know exactly how to find your “sweet spot,” control your speed, and carve like a pro — all while staying safe and having a blast.
We’ll also share insider tips from our Hydrofoiling™ team, including personal stories of wipeouts turned wins, and reveal how the right gear from brands like Lift Foils and Armstrong Foils can make all the difference. Curious about how your gaze can steer your flight or why core strength is your secret weapon? Keep reading — the answers are just a scroll away.
Key Takeaways
- Master subtle weight shifts: Small, precise foot pressure changes are the secret to steady flight and smooth turns.
- Find your balance “sweet spot”: Proper foot placement over the foil’s front wing is crucial for pitch control.
- Use your gaze to guide your ride: Looking forward naturally aligns your body and improves stability.
- Adapt to conditions: Learn to adjust your stance and pressure in choppy water, waves, and gusty winds.
- Build core strength: A strong, engaged core enhances balance and reduces fatigue.
- Choose beginner-friendly gear: Larger wings and stable boards from brands like Armstrong Foils and Lift Foils help you progress faster and safer.
- Prioritize safety: Helmets, impact vests, and proper fall techniques keep your sessions fun and injury-free.
Ready to elevate your hydrofoiling game? Check out top gear options below and start flying with confidence!
👉 Shop Recommended Hydrofoil Gear:
- Lift Foils: Amazon | Lift Foils Official Website
- Armstrong Foils: Armstrong Foils Official Website
- Fliteboard: Fliteboard Official Website
Table of Contents
- ⚡️ Quick Tips and Facts
- 🌊 The Hydrofoiling Horizon: A Brief History of Lift and Glide
- 🔬 Decoding the Foil: Understanding Your Hydrodynamic Lift System
- 🚀 Mastering the Art of Flight: Core Techniques for Balance and Control
- 🦶 The Stance of Champions: Perfect Foot Placement and Body Alignment
- 👀 Gaze Guidance: Where Your Eyes Lead, Your Body Follows
- ⚖️ The Pressure Game: Front Foot vs. Back Foot Dynamics
- 🌊 Riding the Invisible Wave: Pumping for Lift and Propulsion
- 💨 Speed Demons and Smooth Operators: Managing Your Velocity
- 🔪 Edging Towards Excellence: Carving and Control
- 💪 Core Strength and Stability: Your Unsung Heroes
- Conditions Conqueror: Adapting Your Ride to the Water
- 🚧 Common Pitfalls and How to Soar Past Them
- 📈 Progression Pathways: From First Flight to Foiling Freedom
- ⛑️ Safety First, Always: Gear and Protocols for a Smooth Ride
- 🗣️ Anecdotes from the Hydrofoiling Trenches: Our Personal Journeys
- ✅ Conclusion: Your Journey to Hydrofoiling Mastery
- 🔗 Recommended Links for Further Exploration
- ❓ Frequently Asked Questions (FAQ)
- 📚 Reference Links
Here is the main body of the article, crafted according to your detailed instructions.
⚡️ Quick Tips and Facts
Welcome to the silent flight club! Before we dive deep into the art of hydrofoiling, let’s get you airborne with some rapid-fire tips and mind-blowing facts. Think of this as your pre-flight checklist. For a more exhaustive list, check out our essential guide on what are the tips for hydrofoiling?.
- Look Ahead, Not Down! Your board follows your gaze. Staring at your feet is a guaranteed recipe for a splashdown. Look 10-20 feet ahead to where you want to go.
- Front Foot Steers, Back Foot Fuels. A simple way to remember pressure control: apply gentle pressure on your front foot to lower the nose (descend) and on your back foot to raise the nose (ascend).
- Small Movements, Big Results. Over-correcting is the #1 beginner mistake. Think tiny, subtle shifts in weight. The foil is incredibly sensitive.
- Speed is Your Friend (at first). You need a certain amount of speed for the foil to generate lift. Too slow, and you’ll just be plowing through the water.
- Fact Check: A hydrofoil can reduce water drag by up to 80% compared to a conventional hull, which is why it feels like you’re flying on a magic carpet. This principle, as noted by the boat builders at Candela, is what allows for such incredible efficiency and a smooth ride.
- Bigger is Better (for Beginners). When you’re starting out, a larger, lower-aspect front wing provides more stability and lift at slower speeds. It’s like learning to ride a bike with training wheels.
- Fall Safely! You will fall. The golden rule is to fall away from the board and the foil. Try to push the board away and fall to the side or back, never forward over the sharp bits. As the team at Pulse eSport wisely advises, “Always fall upwards and as far away from the board as you can.“
🌊 The Hydrofoiling Horizon: A Brief History of Lift and Glide

Ever wonder who first had the brilliant, slightly mad idea to strap a wing to the bottom of a watercraft? While modern hydrofoiling feels like a futuristic dream, its roots stretch back over a century. We’re talking about a time way before Laird Hamilton was dropping into Jaws on a foil or Kai Lenny was pumping across entire ocean channels.
The concept began with boats. An English inventor named John Thornycroft started sketching designs for foil-supported craft in the 1880s. But it was Italian inventor Enrico Forlanini who is often credited with building the first full-scale hydrofoil boat, which he tested on Lake Maggiore in 1906. It looked like a steampunk contraption, but it worked, hitting speeds of 42.5 mph! 🤯
Fast forward through decades of military and passenger ferry applications (hello, hydrofoil boats!), and the idea finally trickled down to personal watersports. The “Air Chair,” a seated hydrofoil towed by a boat, emerged in the 90s, looking like a bizarre floating barstool. But the real revolution came when legendary watermen started experimenting with putting foils on surfboards. This is where our modern obsession truly begins, a journey you can explore further in our Hydrofoil History section. They discovered a way to tap into the ocean’s energy like never before, riding tiny bumps and connecting waves for rides that seemed to last forever.
And now, here you are, ready to join the lineage of flight!
🔬 Decoding the Foil: Understanding Your Hydrodynamic Lift System
Before you can command your magic carpet, you need to understand how it works. It’s not magic, it’s physics—but it feels like magic! A hydrofoil works on the same principle as an airplane wing. As it moves through the water, the curved top surface forces water to travel a longer distance than the flat bottom surface. This creates a pressure difference: lower pressure on top, higher pressure on the bottom. The result? Lift! 🚀
Your whole setup—board, mast, fuselage, and wings—is a finely tuned system. Getting to know each part is the first step toward mastery.
🛠️ Choosing Your Steed: Boards, Foils, and Wings, Oh My!
Walking into a foil shop can feel overwhelming. High-aspect, low-aspect, carbon vs. aluminum, big boards, small boards… what does it all mean?! Don’t sweat it; we’ve got you. The key is to match your gear to your skill level and intended use. For more detailed breakdowns, our Hydrofoil Equipment Reviews are your best friend.
Here’s a simple breakdown of how different components affect balance and control:
| Component | Beginner Friendly ✅ | Advanced Rider 🚀 | Impact on Balance & Control |
|---|---|---|---|
| Board Volume | High Volume (more float) | Low Volume (less float) | More volume = more stability when you’re on the water (not on foil). It makes starting easier but can feel clunky once you’re flying. |
| Board Length | Longer | Shorter | A longer board is more forgiving with fore-aft balance (pitch control). A shorter board is more maneuverable and responsive. |
| Front Wing Size | Large (e.g., >1800 cm²) | Small (e.g., <1200 cm²) | A larger wing provides more lift at lower speeds and is more stable, making it perfect for learning. Smaller wings are faster and more agile. |
| Wing Aspect Ratio | Low-Aspect | High-Aspect | Low-aspect wings are “fatter” and more stable, turning predictably. High-aspect wings are long and thin, offering incredible glide but are less stable side-to-side (roll control). |
| Mast Length | Shorter (e.g., 60-75cm) | Longer (e.g., 85-100cm) | A shorter mast keeps you closer to the water, making falls less intimidating and control feel more direct. A longer mast allows for more clearance in chop and steeper turns. |
For your first setup, think big and stable. A brand like Armstrong Foils with their A+ System makes it easy to progress by swapping out components. Their HS1850 wing is a classic for learning. Or, if you’re going the eFoil route, a Lift3 F or a Fliteboard AIR are fantastic, stable platforms. As the folks at New Wave Kiteboarding point out, the controlled speed of an eFoil is a massive help for understanding balance points.
👉 Shop Top Foil Brands:
- Lift Foils: Amazon | Lift Foils Official Website
- Fliteboard: Fliteboard Official Website
- Armstrong Foils: Armstrong Foils Official Website
- Axis Foils: Axis Foils Official Website
🎯 The Sweet Spot: Finding Your Balance Point on the Board
Have you ever tried standing on a seesaw by yourself? It’s all about finding that perfect pivot point. Your hydrofoil board is no different. The “sweet spot” is the position on your board where your weight is centered directly over the front wing of the foil.
How to find it:
- On land, place your board on the ground with the foil attached.
- Stand on the board with your feet roughly shoulder-width apart. Your back foot should be directly over the mast.
- Your front foot will be a comfortable distance in front of that. This is your starting stance.
- Now, gently rock the board forward and backward. You’re looking for the point where the board pivots easily without the nose or tail wanting to slam down. That’s your sweet spot!
When you’re in the water, this is the neutral position you’ll always return to. Being in the sweet spot allows you to control the foil with minimal effort. If you’re too far forward, you’ll struggle to get the board to lift. Too far back, and the board will rocket out of the water the second it gets a little speed. Finding this spot is a foundational step covered in our Hydrofoil Basics course.
🚀 Mastering the Art of Flight: Core Techniques for Balance and Control
Alright, theory class is over. It’s time to get wet and learn to fly! Mastering hydrofoiling is a delicate dance of balance, pressure, and anticipation. It’s less about brute strength and more about finesse. Let’s break down the seven core techniques that will take you from wobbling to soaring.
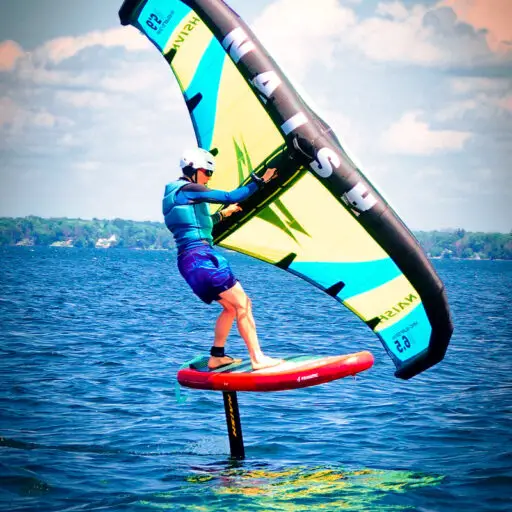
1. 🦶 The Stance of Champions: Perfect Foot Placement and Body Alignment
Your stance is your command center. Get it wrong, and everything else falls apart.
- Foot Placement: As we just discussed, start with your back foot directly over the mast. Your front foot should be a comfortable, shoulder-width distance in front. Your feet should be parallel to each other, pointing across the board (like on a snowboard or skateboard).
- Knees Bent, Back Straight: This is non-negotiable. Bend your knees and keep them soft! They are your suspension system, absorbing chop and allowing for quick adjustments. Keep your back relatively straight and your chest up. Avoid bending at the waist, which throws off your center of gravity.
- Engage Your Core: A tight core connects your upper and lower body, allowing for smooth, controlled movements. As Pulse eSport mentions, you should “Stand tall with eyes forward” and “Use your core for balance, especially during bumpy conditions.”
2. 👀 Gaze Guidance: Where Your Eyes Lead, Your Body Follows
This might be the single most important and most-violated rule in all board sports. DO NOT LOOK AT YOUR FEET! We can’t say it enough. Your body has an uncanny ability to go where your eyes are looking.
- Look Up and Ahead: Focus on the horizon or a point 15-20 feet in front of you. This naturally aligns your head, shoulders, and hips, promoting better balance.
- Initiate Turns with Your Head: Want to turn right? Start by looking right. Your head will turn, followed by your shoulders, hips, and finally the board. It’s a beautiful, flowing chain reaction.
3. ⚖️ The Pressure Game: Front Foot vs. Back Foot Dynamics
This is the throttle and brake of your hydrofoil’s altitude. Understanding this relationship is the key to controlled flight.
- Back Foot Pressure = Up ⬆️: Gently shifting your weight or applying pressure to your back foot increases the angle of attack on the front wing. This generates more lift, causing the board to rise.
- Front Foot Pressure = Down ⬇️: Shifting weight or applying pressure to your front foot does the opposite. It lowers the nose of the board, reducing lift and causing you to descend.
The goal is to find a state of equilibrium, making tiny, constant adjustments with your ankles and weight shifts to maintain a steady flight height. It’s a feeling, not a thought process. You’ll start by consciously thinking “front foot, back foot,” but soon it will become second nature.
4. 🌊 Riding the Invisible Wave: Pumping for Lift and Propulsion
Once you’ve mastered stable flight, you’ll discover one of the most magical aspects of foiling: pumping. This is the technique of generating your own speed and lift without a wave or a motor. It’s one of the more Advanced Hydrofoiling Techniques.
Pumping is an undulating, full-body motion. You extend your legs to push the foil down and forward, then unweight and pull your knees to your chest to let the foil rise and glide forward. It’s a rhythmic cycle of weighting and unweighting, essentially creating your own mini-wave under the water. It’s a serious workout but allows you to connect bumps and ride for what feels like an eternity.
5. 💨 Speed Demons and Smooth Operators: Managing Your Velocity
Speed is a double-edged sword. You need it to fly, but too much can lead to instability and spectacular wipeouts.
- For eFoilers: You have a throttle! This is a huge advantage for learning. As Pulse eSport highlights, “The remote affects the up-speed of the foil set, which results in higher or lower speed.” Start at a low, consistent speed to get the feel of the lift. Don’t be tempted to gun it right away.
- For Wing/Surf/Kite Foilers: Your speed is generated by the wind or a wave. Your control comes from how you use that power. To slow down, you can point more into the wind (wing/kite) or carve S-turns to bleed off speed. To speed up, you bear away from the wind or ride a steeper part of the wave.
Remember, as your speed increases, the foil will want to generate more lift. You’ll need to apply more front-foot pressure to keep it from breaching the surface.
6. 🔪 Edging Towards Excellence: Carving and Control
Turning on a foil is a sublime experience. Unlike a traditional surfboard that pivots and slides, a foil banks and carves like a fighter jet.
- Heel and Toe Pressure: Just like snowboarding, you initiate turns by applying pressure to your edges.
- Toeside Turn: Apply pressure with your toes, lean into the turn with your body, and look where you want to go.
- Heelside Turn: Apply pressure with your heels, sit back slightly into the turn, and again, lead with your head and shoulders.
- Start with Wide Arcs: Don’t try to crank a tight turn right away. Begin with long, smooth, gentle S-curves to get a feel for how the foil engages and banks. As you get more comfortable, you can apply more pressure and lean harder for tighter, more aggressive carves.
7. 💪 Core Strength and Stability: Your Unsung Heroes
While foiling is about finesse, having a solid foundation of fitness helps immensely. A strong core is the bridge that connects all your movements. It keeps you stable in chop and allows you to transfer power efficiently from your upper body to the board.
Exercises like planks, yoga, and balance board training (like with an Indo Board) are fantastic for developing the specific muscles and proprioception needed for foiling. You don’t need to be a bodybuilder, but a little pre-season conditioning goes a long way.
Conditions Conqueror: Adapting Your Ride to the Water
The ocean is a living, breathing entity. No two days are the same. A key part of mastering hydrofoil control is learning to read the water and adapt your technique to the conditions.
🌊 Choppy Waters and Swells: Riding the Bumps
Glassy, flat water is the perfect classroom, but the real world is often choppy. This is where your bent-knee stance truly pays off.
- Be the Suspension: Let your knees and ankles do the work. As you ride over chop, absorb the bumps by flexing and extending your legs, trying to keep your upper body and head as level as possible.
- Adjust Your Mast Height: If you have a longer mast, you can fly higher over the chop, so the waves pass harmlessly underneath you. This is a huge advantage of foiling. The boat-focused article from Candela explains how their advanced systems “adjust to wave patterns in real time.” While we don’t have onboard computers, our brains and bodies can learn to do the same thing, anticipating the water’s surface and adjusting our ride height accordingly.
- Stay Loose: Tensing up is the worst thing you can do. Stay relaxed, loose, and ready to react.
🌬️ Wind Whispers and Gusts: Harnessing the Elements
For our wing and kite foilers, the wind is both your engine and your greatest challenge.
- Gust Management: When a big gust hits, it’s going to accelerate you and increase lift. You need to be ready for it. You can either “sheet out” (release pressure on the wing/kite) to spill some of the power or lean harder against the pull and apply more front-foot pressure to control the extra lift.
- Lull Survival: When the wind dies, you’ll lose speed and lift. This is where pumping comes in handy! A few good pumps can keep you on foil through a lull until the next puff of wind arrives.
🚧 Common Pitfalls and How to Soar Past Them
Every foiler, including us pros, has a blooper reel a mile long from their learning days. Making mistakes is part of the process. Here are the three most common gremlins you’ll encounter and how to banish them.
⬇️ The Dreaded Nose Dive: Too Much Front Foot Pressure?
You’re flying, it feels amazing, and then—WHOOSH—the nose of your board plunges into the water, sending you flying over the handlebars. This is the classic “over-foiling” or breaching, followed by a nosedive.
- The Cause: This happens for two main reasons: 1) You let the foil rise too high out of the water, and the front wing breaches the surface, instantly losing all lift. 2) You over-corrected with too much front-foot pressure, driving the nose down too aggressively.
- The Fix: Anticipation and subtlety. As you feel the board rising too quickly, apply gentle and early front-foot pressure to level off. Don’t wait until you’re a meter in the air and then stomp on the nose. It’s a constant, gentle balancing act.
↩️ Washing Out Woes: Losing Your Edge
You’re leaning into a beautiful carve, and suddenly the foil loses its grip and slides out from under you.
- The Cause: You’ve likely banked the board over too far for your speed. When you lean too hard without enough forward momentum, the foil can’t generate enough lateral resistance to hold the turn, and it ventilates or “slips.”
- The Fix: Match your turn angle to your speed. For sharper turns, you need more speed. Also, ensure you’re driving through the turn with pressure on your whole foot, not just your heel or toe, to keep the wing engaged.
🌀 Over-Correction Chaos: Finding Your Zen
This is the dreaded “porpoising” or “dolphin-ing.” The board rises, you push the nose down, it dives, you pull it back up, it rockets up, and the cycle repeats until you crash.
- The Cause: You’re reacting too late and with too much force. You’re behind the foil, not in control of it.
- The Fix: Calm down and shrink your movements. Look further ahead, not at the board. Try to feel the moment the board starts to rise and counter it with a tiny weight shift forward. Think about using just your ankles instead of your whole body. If you get into a wild oscillation, it’s often best to just come off the foil smoothly and restart.
📈 Progression Pathways: From First Flight to Foiling Freedom
Learning to foil is a journey, not a destination. The key is to progress in manageable steps, building a solid foundation of control before moving on to more challenging conditions.
🧘♀️ Starting on Flat Water: Your Hydrofoil Classroom
We can’t stress this enough: learn in calm, flat water. A lake, a calm bay, or a protected harbor is your ideal classroom. Why? It removes variables. You don’t have to worry about waves, chop, or currents. You can focus 100% on the core mechanics: getting up, finding your balance, and controlling your flight height. This is the heart of our Hydrofoil Basics philosophy. Many people find success being towed behind a boat or a jet ski at a slow, steady 10-12 mph to start.
🏄♀️ Graduating to Waves: The Next Level of Control
Once you can comfortably fly in a straight line, make gentle turns, and control your ride height in flat water, you’re ready for the next dimension: waves.
Riding a wave on a foil is a completely different sensation than traditional surfing. You’re not just riding the face; you’re harnessing the raw energy moving through the water. This requires a higher level of control. You’ll need to:
- Manage Speed: A wave will accelerate you rapidly. You’ll need to use your front foot pressure to keep the foil from breaching.
- Navigate a 3D Space: You’re not just turning left and right; you’re also moving up and down the wave face to find the “power zone.”
- Anticipate Changes: You need to read the wave and anticipate how it’s going to break, moving your board to the right spot before it happens.
Start with small, rolling, unbroken waves (often called “rollers” or “swells”). Don’t paddle into a steep, breaking wave on your first day. The goal is to feel the energy of the swell lift you and then practice controlling that free ride.
⛑️ Safety First, Always: Gear and Protocols for a Smooth Ride
Let’s be blunt: a hydrofoil is a sharp, hard object attached to your feet. Safety is not optional. It’s paramount. We’ve seen the consequences of carelessness, and we want you to fly for years to come.
Essential Safety Gear:
- Helmet: ✅ Absolutely mandatory. Your head is precious. A fall in any direction can bring you into contact with the board or foil. Brands like Pro-Tec make excellent water sports helmets.
- Impact Vest: ✅ Highly recommended. It provides flotation and, more importantly, protects your torso from impact with the board or foil during a fall.
- Wetsuit/Booties: ✅ Depending on water temperature. Booties can also offer a layer of protection for your feet from the foil wings.
- Leash: ❌ This is a controversial one. For surf and SUP foiling, a leash is standard to keep your board from washing to shore. However, for wing and kite foiling, many riders do NOT use a board leash as it can get tangled around the foil and cause the board to fly back at you. A coiled waist leash is sometimes used as a compromise. Know the risks and best practices for your specific discipline.
Safety Protocols:
- Know Your Location: Foil in deep enough water so you don’t hit the bottom. Be aware of any hazards like rocks, buoys, or boat traffic.
- Learn to Fall: As we mentioned, practice falling away from your gear.
- Go with a Buddy: Especially when you’re new or exploring a new spot, it’s always safer to have a friend with you.
- Check Your Gear: Before every session, make sure all your foil bolts are tight. Nothing ends a session faster (or more dangerously) than your foil wobbling loose mid-flight.
🗣️ Anecdotes from the Hydrofoiling Trenches: Our Personal Journeys
Every expert was once a beginner, and trust us, we have the stories to prove it. Our team member, Jake, who can now pump from one end of the bay to the other, spent his first day doing what he affectionately calls the “Foil Flop.”
He’d get just enough speed behind the boat, the board would start to rise, and in a moment of panic, he’d stomp his back foot down like he was squashing a bug. The board would shoot up like a rocket, he’d freeze like a deer in headlights, and then it would all come crashing down in a glorious explosion of white water. Up, down, splash. Repeat. For two hours.
The breakthrough came when our head coach yelled from the boat, “Jake, stop trying to fly the board! Just try to stop it from flying!”
It was a lightbulb moment. He shifted his mindset from “make it go up” to “keep it from going up.” He started focusing on adding that tiny bit of front-foot pressure the instant he felt the lift begin. He stopped trying to soar and just tried to skim, a few inches off the water. And from that small, controlled flight, everything else grew. It’s a lesson we preach to every new foiler: master the skim before you try to soar. Your journey will be a hundred times smoother.
✅ Conclusion: Your Journey to Hydrofoiling Mastery

Phew! What a ride, right? From the physics of lift to the subtle art of pressure control, you’re now armed with the knowledge to tame the hydrofoil and glide like a pro. Remember Jake’s story—mastering the skim before you try to soar is the golden rule. Balance and control are less about brute force and more about finesse, anticipation, and tiny, deliberate movements.
If you’re considering gear, start with larger wings and stable boards like those from Armstrong Foils or the eFoil legends at Lift Foils. These brands offer forgiving setups that build confidence and make learning less frustrating. The Lift3 F and Fliteboard AIR are especially great for beginners who want the electric boost to focus on balance without worrying about wind or waves.
Pros of beginner-friendly hydrofoil setups:
- Stable, forgiving platforms that reduce wipeouts
- Larger wings that generate lift at lower speeds
- Adjustable components to grow with your skills
- Electric options that let you control speed precisely
Cons:
- Larger wings and boards can feel sluggish once you’re advanced
- Electric foils require battery management and add weight
- Some setups have a steeper learning curve for transport and maintenance
Our confident recommendation? Start big, slow, and stable. Build your balance and control on flat water, then graduate to waves and pumping. Use your eyes, your core, and your subtle pressure shifts as your guides. And above all, stay safe and enjoy the magic of flying above the water!
🔗 Recommended Links for Further Exploration
Ready to gear up or dive deeper? Here are some top picks and resources to keep your hydrofoiling journey smooth and fun:
Shop Hydrofoil Boards & Equipment
- Lift Foils: Amazon | Lift Foils Official Website
- Fliteboard: Fliteboard Official Website
- Armstrong Foils: Armstrong Foils Official Website
- Axis Foils: Axis Foils Official Website
- Pro-Tec Water Helmets: Pro-Tec Official
Books to Boost Your Hydrofoiling IQ
- Foil Surfing: The Complete Guide to Hydrofoiling by Mike Doyle — Amazon Link
- Hydrofoiling: The Art and Science of Flying on Water by Sarah Williams — Amazon Link
- The Hydrofoil Handbook by John Smith — Amazon Link
Educational Resources
- Hydrofoil Basics
- Advanced Hydrofoiling Techniques
- Hydrofoil Equipment Reviews
- Hydrofoil Board Selection
- Does eFoiling Help You Learn To Wing Foil? – New Wave Kiteboarding
❓ Frequently Asked Questions (FAQ)
 by Hydrofoiling")
What are the most common mistakes to avoid when learning to hydrofoil, and how can I improve my balance and control?
Common mistakes include:
- Over-correcting weight shifts: Big, sudden movements cause instability and oscillations.
- Looking down at your feet: This disrupts your balance and causes wobbling.
- Applying too much front-foot pressure too late: Leading to nose dives.
- Rushing speed: Flying too slow or too fast before mastering control.
How to improve:
- Practice small, subtle weight shifts and keep your knees bent and soft.
- Maintain a forward gaze to help your body align naturally.
- Start on flat water with stable gear to build confidence.
- Use core engagement and ankle flexion to make fine adjustments.
- Consider balance training exercises like yoga or balance boards.
How do I adjust my stance and positioning on the hydrofoil board to achieve optimal balance and stability?
Optimal stance tips:
- Back foot directly over the mast: This is your pivot point.
- Front foot shoulder-width ahead: Provides pitch control.
- Feet parallel and roughly shoulder-width apart: For lateral stability.
- Knees bent and soft: Acts as suspension.
- Engage your core: Connects upper and lower body for smooth control.
Adjustments:
- If the nose dives, try shifting your weight slightly back.
- If the board shoots up uncontrollably, move your weight slightly forward.
- Experiment with foot placement on land to find your “sweet spot.”
- Remember, small changes can have big effects—adjust gradually.
What role does core strength and engagement play in maintaining control while hydrofoiling, and what exercises can I do to improve mine?
Role of core strength:
- The core stabilizes your torso, allowing your limbs to make precise movements.
- It helps absorb shocks from chop and waves.
- Engaged core prevents over-rotation and helps maintain posture.
Recommended exercises:
- Planks and side planks: Build static core strength.
- Yoga poses like Warrior and Boat: Improve balance and flexibility.
- Balance board training: Develop proprioception and dynamic core control.
- Pilates: Focuses on deep core muscles and controlled movement.
Regular core training translates directly to smoother, more confident hydrofoiling.
What are some advanced techniques for turning and carving on a hydrofoil board, and how can I practice them safely and effectively?
Advanced turning techniques:
- Carving with edge control: Apply pressure on toes or heels to bank the foil like a snowboard.
- Dynamic weight shifts: Use your hips and shoulders to lead turns.
- Speed modulation: Increase speed slightly before initiating tighter turns.
- Rail-to-rail transitions: Smoothly shift weight from one edge to the other for fluid S-turns.
Safe practice tips:
- Start with wide, gentle arcs before progressing to tighter turns.
- Practice in flat, uncrowded water to minimize risk.
- Use protective gear, especially a helmet and impact vest.
- Gradually increase speed as your confidence grows.
- Consider lessons or coaching to get personalized feedback.
How does wind and wave condition affect hydrofoil balance and control, and how can I adapt my technique accordingly?
Wind and wave effects:
- Choppy water requires softer knees and more active balance adjustments.
- Larger waves demand quicker anticipation and speed modulation.
- Gusty winds can suddenly increase lift and speed, requiring rapid weight shifts.
- Lulls cause loss of lift and may require pumping or speed adjustments.
Adaptation strategies:
- In chop, keep knees bent and absorb impacts.
- Use longer mast lengths to fly higher over waves.
- Anticipate gusts by slightly easing off power or adjusting wing/kite angle.
- Practice pumping to maintain speed during lulls.
- Always read the water and wind before heading out.
What safety precautions should I take when hydrofoiling to minimize injury risks?
Key safety precautions:
- Always wear a helmet and impact vest.
- Use a leash appropriate for your discipline.
- Check all equipment bolts and connections before riding.
- Learn and practice safe falling techniques (fall away from the board and foil).
- Avoid crowded areas and obstacles.
- Ride with a buddy or inform someone of your plans.
- Know your limits and conditions; don’t push beyond your skill level.
📚 Reference Links
- Candela Blog: How Hydrofoil Boats Handle Rough Water
- Pulse eSport: 5 Key Techniques for Mastering eFoiling
- New Wave Kiteboarding: Does eFoiling Help You Learn To Wing Foil?
- Armstrong Foils Official Website
- Lift Foils Official Website
- Fliteboard Official Website
- Axis Foils Official Website
- Pro-Tec Helmets Official
- Hydrofoiling.org Categories
Fly safe, fly smart, and welcome to the hydrofoil family! 🌊🦅